File Sharing in Windows 10 - that's what we gonna
see in this post - Works on Windows 10 Creators Update, Windows 10
Anniversary Update, and other editions of Windows like Windows 10 earlier builds like Aug 2015
and Nov 2015 builds.
In our last post we had seen how to stop OneDrive Sync in Windows 10 which explains the concept
of disabling OneDrive sync in Windows 10 without any software..
In this post, let's see how to quickly share files in Windows 10..
Do you require any Application ?
You, don't require any software to share files, however you can use free apps like Connect2 App for
transfer files between devices in Windows 10
How to do it ?
Just follow the Following Steps..
How to enable file sharing or how to share files without any Software in Windows 10
1) First Open File Explorer
If you don't know, how it is , then don't worry, just click on the below helpful link (what is file...)
[Helpful link : What is file explorer and how to open it]
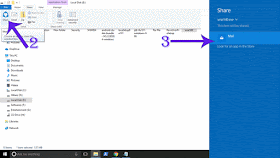
2) Now, go to the file which you wish to share
3) Select the file you want to share..
4) After selecting the file, Click on the share tab.
5) Expand it
6) You will find the share option, click on it..
7) It will now open the apps that support sharing the file from right side.

8) Select the Application, which you wish to use share to..
That's it..
Like, this you can use this feature to share items to various applications.
The App you wish to share doesn't appear on the list ? Cool, then you can enable it using the steps
shown in this video[link]
Hope it is helpful.
That's the end of this post...
Click to read all basic tutorials..
2) Now, go to the file which you wish to share
3) Select the file you want to share..
4) After selecting the file, Click on the share tab.
5) Expand it
6) You will find the share option, click on it..

8) Select the Application, which you wish to use share to..
That's it..
Like, this you can use this feature to share items to various applications.
The App you wish to share doesn't appear on the list ? Cool, then you can enable it using the steps
shown in this video[link]
Hope it is helpful.
That's the end of this post...
Click to read all basic tutorials..
