December 2016

Some Pages that you Should notice

Lineage OS - Update on Infrastructure status and Official builds details revealed..

Lineage OS - Infrastructure status and Official builds details... I had told that lineage Os would be

the continuation of Cyanogen mod in our earlier post... Today, as they said, they had released an

update regarding the lineage OS. In the post the community said, they are trying to reach people

and are offering invites to build the next OS.

If you hadn't received an invitation, then you may soon be invited, says their Post..

What the team said, was they are not going to build the ROM immediately. They are first going to

build/ test the version of OS from Others, and will decide what they can do next..

Currently, (as of Dec 29,2016) the community asks people to contribute to the community if they are

willing to build slaves and mirrors..

lineageos update


So, if you wish to contribute then, you can contact them via infra@lineageos.org .

Further details, about the project and ROM's are not revealed now, they mentioned it will be

available, when it was ready..

That's it..

Hope the information was helpful.


Windows 10 Activation error codes 0x803f7001, 0xc004c003,0xc004f012,0xc005f074,0xc004f050,0xc004f014 and more.. - Here is What it means !

Windows have separate activation error codes to denote the failure in activating windows 

10. At first, 

when i searched i was little bit helpless, as there are nearly 100 activation error codes that 

were on the Windows 10 Activation helpline. Depending on the type, the Activation differs.. 

So, in this post i had posted some known activation codes that might help you in solving 

errors as you don't need to search for everything..


Windows 10 Activation failed with Error code 0x803f7001, 0x800704cF

1) If you have the above error code, then what MS Says, is Microsoft didn't find your Windows 

10 as valid or geninue copy. So, you need to change your product Key to solve your 

Problem.

Windows 10 Activation failed with Error code 0xC004C003, 0xC004C060, 0xC004C4A2, 0xC004C4A2, 0x803FA067L, 0xC004C001, 0xC004C004, 0xC004F004, 0xC004C007, 0xC004F005, 0xC004C00F, 0xC004C010, 0xC004C00E, 0xC004C4A4, 0xC004C4A5, 0xC004B001, 0xC004F010, 0xC004F050

If you have any of the above error code then. the reason would be any of the following reason,

2) Microsoft Says, When such error codes appear then, then it is likely to denote that you are trying to activate your Windows Edition with the Other edition's Key. for example : You are requested to enter Product key for your Windows 10 Pro, but you had entered Windows 10 Enterprise
s or Home's product key.. So, try to activate with the proper key.

3) It also says, that this error will also happen when activation servers are busy, so you need to wait for sometime to get activated.

Windows 10 Activation failed with Error code 0xC004F034, 0xC004F210, 0xC004E016, 0xC004F210, 

 This is same as  1.,you are activating with the key that is invalid.

Windows 10 Activation failed with Error code 0xC004FC03, 0x8007267C 

When, this error happens then it is because of your internet connection problem..

You need to activate windows through Phone call or with stable internet connection.

Press Windows + R -> slui 04 -> Follow the onscreen instructions.

Windows 10 Activation failed with Error code 0xC004E028

It means, your activation is currently under progress, and it will be finished ASAP


Windows 10 Activation failed with Error code 0xD0000272, 0xC0000272, 0xc004C012, 0xC004C013, 0xC004C014

It means Windows couldn't find the Activation servers, and it will be activated automatically when 

it connects the Servers.

Windows 10 Activation failed with Error code 0xC004C008, 0xC004C770, 0x803FA071, 0xC004C020

It means you are trying to activate windows with the key that was already used by another 

computer.

You need to buy a fresh key.

Windows 10 Activation failed with Error code 0xC004F00F, 0x8007232B, 0xC004F074, 0xC004F038, 0x8007007B

This means, you are trying to activate windows with the Key that will activate only Windows 10 Enterprise edition.. So, you need to enter the valid Windows 10 Home or Windows 10 Pro key.

(or) You might be activating the Work place computer without connecting to the Workplace network..

So, you need to reactivate again.


Windows 10 Activation failed with Error code 0x80072F8F

This activation error will occur, when your time and date is incorrect..

Change your Windows 10 System time and it will initate the activation process


Windows 10 Activation failed with Error code 0xC004E003

This error happen when some apps or software you installed had changed your system files..

You need to perform system restore to fix the issue, or you can try to activate again.


Windows 10 Activation failed with Error code 0x80004005

You need to run the activation troubleshooter..

Just goto settings -> Update & security -> Activation -> Troubleshoot

To Activate..

Open settings -> Update & security -> Activation

That's it..

Hope it is helpful.

Are you a beginner ? then below is a link to find all the beginner articles that may help you in

various stages and in mastering basics of Windows 10, just click on the below link to view..

Click to read all basic tutorials..

Coming Soon ! Feature to pause windows updates in Windows 10 [Creators Update ]

You can pause Windows Updates in Windows 10 Creators Update. Yes, you read it right!

You people using windows 10 probably may had a question about this " How to pause windows 

Updates in Windows 10 ?, or how can i pause Windows updates in Windows 10.!

It seems Microsoft is going to solve this issue with an option,

that is more likely to be introduced in Windows 10 Creators Update. 

Coming Soon ! Feature to pause windows updates in Windows 10[ Creators Update ]


we have found this option on Windows 10 Insider preview build 14997 . This Preview has lot of new 

features right from the time of installation, which many users had shared while installing on PC

manually. the Installation screen to have 

differed (especially while you connect to internet) (It's not the one you seen on Anniversary Update ), 

and it is likely to be continued as it is in Windows 10 Creators Update. 

 I had seen many new features on various friends sites, but the 


This feature was seen on Windows 10 creators update preview build 14997 which recently leaked 

online. It was seen on Enterprise edition of Windows 10, so i don't know whether all other builds 

will have this feature😯😯..

If it was available then i hope you would be the happiest person on this planet😊😊..

That's it..

Enable or disable Blue light Reduction - How to Lower Blue Light Automatically in Windows 10 [Creators Update feature]

How to Lower Blue Light Automatically in Windows 10 - Enable or disable bluelight filtering in

Windows 10 Creators Update that's what we gonna see in this post.

It seems Microsoft is bringing the f.lux an  freeware tool that will automatically lower our screen's

blue light to prevent our eyes from spoiling while using PC. What this tool will do is, it will

automatically adjust our screen brightness/ filters blue light emmiting from our screen based on our

day time and night time.

Since, it is a useful feature, lot of users requested Microsoft to include it as an option in Windows 10.

But, it was not included in the previous builds ..! but now Microsoft is gonna include this feature as

we got this option on the Windows 10 Creators update insider build 14997.

Since, the stable build will feature all the  options served to insider previews most of the time, you

will receive this feature in Windows 10 Creators Update aka redstone 2 build.

OK, let's see how to turn on or turn off blue light filtering in Windows 10.

Just follow the below steps..


1) Press Windows + I Keys, which will open settings app

[Helpful link : How to open settings using different methods in Windows 10]

2) Click on System

3) Select display

4) Now, on your right pane you will see an option "Lower Blue light Automatically "

We need to change this option.

If you wish to turn on or enable lower blue light , then

Click/tap right side of the Option

so that it looks ON.

On the other hand, if you wish to turn off blue light filtering in windows 10, then

simply click/tap left side of the option

so that it looks OFF.

That's it..

Hope it is helpful.


Click to find latest articles

Reset registry to default in Windows 10 - How to restore windows registry to default in Windows 10 [Guide]

Reset registry to default in Windows 10 - How to restore windows registry to default in Windows 10,

that's what we gonna see in this post..

Most, of the time when we need to customize more, we need the help of registry and powershell.

Though, i advise you to create an backup of registry in windows 10 before changing registry.some of

us fail to do the task as its general human psychology, which will look for the key information,

forgetting the rest. So, if you had made the mistake and wish to repair windows 10 registry, then here

is your guide on how to do it..

Do we really need to restore registry ?

In Windows, there is an facility called Windows Registry Checker that will run every time when

your system starts.. It will automatically repairs your registry, if it finds any violation, so we don't

need to restore registry in windows 10. However, things won't work as expected so we need to

restore the registry manually sometime.. just follow the below steps to restore.

How to reset regedit to default in windows 10

1) Open Powershell

[ Helpful link : How to open powershell in Windows 10]

2) Type the following command and hit enter

scanreg /autorun
Reset registry to default in Windows 10 - How to restore windows registry to default in Windows 10 [Guide]


3) Windows will try to repair the registry when we run the above command.

4) if it couldn't perform the required operation, then run the following commands..

scanreg /fix

scanreg /restore

Sometimes, the above commands, won't work in normal mode so boot into your PC to safe mode and 

try the above steps..

Else, you need to reset the PC.

Open settings - > Update & Security - > Recovery -> Get started (under reset this PC) -> Keep my files - > Follow the onscreen instructions..

Note : Windows will take sometime to reset, it will display continue after reset, click it to enter into 

your PC again.

Hope it is helpful.

Click to find the latest articles...

Install programs on Windows 10 - How to install program in Windows 10 [Beginner's guide]

How to install a program or software or exe or application in Windows 10 ?  that's the question one

of our blog reader asked, he wished to know the steps that are required to install an application on

windows 10. So, in this post let's see how to install application or program in Windows 10.. If you

are searching for this then i hope it is helpful for you too.

Remember application, software, program,etc are just the different names we call, which means,

some people call it as software, some call it as program,etc..they are all same (denoted using

different names)...

How to find a program that can be installed or how can you identify, it is the one that 

can be installed ?


Normally, your windows 10 PC will show which is application and which is not..

You can find it on Type field (See above screenshot).. If it was Application then it is what we can

install..

Remember, Application and Application extension are different items..

We can only install an application not application extension items..

Let me give you a simple trick which may help you to identify it easily..

you will find .exe or .msi, etc at the end of program's name which denotes it is an application.

For example : idm.exe or winrar.exe

So, the first step is to find which is application and which is not..

You can find it using the above trick..

2) After, finding the Application /program /software then double click or single click  on the

application.

3) It will ask for your confirmation by displaying User account control and will ask you to select Yes

or No..

4 ) Select Yes.

If you are not an admin, then you need to enter your system's admin password on the box..

5) After clicking Yes, you will be initialized to the application window.

Installing a program differs from program to program.. As some application may first display license

aggrement and others will display simply display the instructions, some others won' display anything

and will just install on your PC.

The key to successful installation depends on your reading ability..

Read what the current window says, and click appropriate option.

If you are faced with License Aggrement click Agree or Accept.

if you are faced with other windows, then read the onscreen instructions and click the appropriate option, this may be usually Next..

Wait ! Some apps as served as freeware will download their Partner softwares /apps, so makesure

there is any option (check box) which says, like that.. If it says like that uncheck those boxes and

proceed to the next option as downloading such software may affect your PC's performance with

virus or malware depending on the App it downloads.

So proceed every option with caution.

Generally, clicking Next, Next, Next will install the Application.

How to find whether an application was successfully installed in Windows 10 :-

It would be the question that may arise when you install application. Let me, clear your doubt when

an application finished installation, then it would display a window stating that The program was

successfully installed on your Computer click Finish to exit or text that have similar meaning..

When it displays such window, then congrats you had successfully installed an application✌👌..

Cheers!

but, if it displays different text like installation was interrupted, then you need to re follow the above

steps 😳😳..

Like these, you can install any application on any windows 10 desktop or windows 10 laptops.

Hope it is helpful.

Are you a beginner ? then below is a link to find all the beginner articles that may help you in

various stages and in mastering basics of Windows 10, just click on the below link to view..

Click to read all basic tutorials..

Install Printer driver in Windows 10 - How to install hp, canon, etc printers on Windows 10 [Guide]

Install Printer driver in Windows 10 - How to install hp printer driver,Epson printer driver,canon printer driver, samsung, etc printer

drivers. that's what we gonna see in this post..


If you wish to install printer driver in windows 10 then here is a post that may help you..

Do you need any software ?

Yes, you need a software called drivers, which can be downloaded through windows update or

through manufacture site.

You can try some driver installation softwares, if they were freeware.

How to install printer software in windows 10 ...

1) To reinstall printer you need to first uninstall the existing printer driver. So follow the steps shown

in the below post and remove your printer from windows 10 PC

[See : How to remove printer in windows 10]

2) After, uninstalling then follow the steps shown in the below link to know how to add printer in windows 10.

[See : How to add printer in Windows 10]

3) If you can't find the appropriate printer driver, then note your Printer Model Number and its manufacturer name, you can find them on the printer box, if you can't find the box or if there is no box provided then check on the printer.. as

They will be mostly printed/ written on the printer device itself.

For example : HP Pro 577z

4) Note down, the printer model and manufacturer name...

Open Google.com or bing.com

type the model name and manufacturer name and type download.

select the official site  that starts with your manufacturer name..

For example : hp.com or epson.com

5) There, you will find the driver for your device..

6) Download the software and install it like other programs..

Follow the Onscreen instructions to install they will be mostly selecting Next, Next,etc..

That's it..

Hope it is helpful.

Are you a beginner ? then below is a link to find all the beginner articles that may help you in

various stages and in mastering basics of Windows 10, just click on the below link to view..

Click to read all basic tutorials..

Remove Printer in Windows 10 - How to remove printer device and driver in Windows 10

Remove printer on windows 10 - How to remove printer device or delete printer driver on your

Windows 10 PC, that's what we gonna

see in this post. In our last we had seen how to cancel printer queque in windows 10 in 2 steps , in

this post let's see how to remove printer in windows 10. We can remove printer using registry, using

powershell and many more methods..

However, in this post let's see how to remove printer using device manager..

How to delete printer device in windows 10 PC.

1) Press Windows (logo) Key on your keyboard.

2) Type devices

3) Select devices and Printer on the top most result.

4) Click on the device you wish to remove.

5) When you clicked you will see the Remove device option appearing on the bar.

Remove Printer in Windows 10 - How to remove printer device and driver in Windows 10


"Remove device option will be next to Printer server properites."

6) Click on the Remove device option.

Method 2 : Using device manager

How to remove printer driver in windows 10..

1) Open device manager

[See : How to open device manager in windows 10]

2) It will display some text links like Audio, input and outputs, Batteries, Computer,Keyboards,

Monitors,and many other things..

3) Expand your Printers ( Which will be under Printer queue option)  by clicking on > icon that

displayed near that.

4) When you expanded, you can see many items, right click on the printer you wish to remove..

you will see different options like Update driver software, disable, Uninstall,etc..

5) Click on Uninstall

There will be an option "delete drivers" makesure the box is checked.

6) Close and restart your PC.

If it appears again, select disable while on step 4.

This will fix your problem.

Hope it is helpful.

Are you a beginner ? then below is a link to find all the beginner articles that may help you in

various stages and in mastering basics of Windows 10, just click on the below link to view..

Click to read all basic tutorials..

Remove Updates in Windows 10 - How do i remove installed update in Windows 10 Anniversary Edition [Solved]

How do i remove installed update in Windows 10 or how to uninstall update in windows 10 - That's

what we gonna see in this post..

If you wish to uninstall installed update in windows 10, then here is your guide that may be helpful if

you wish to remove or uninstall installed update in windows 10

Do you need any software ?

No, we don't need an software to uninstall windows update in windows 10.

then, how to do it..?

There, are lot of ways, we can use to remove windows update that was installed through windows

update like using command prompt, using registry and using powershell, etc..

However, in this post let's see the easiest method we can use to remove or uninstall the installed

update in windows Anniversary edition..

Just follow the below steps..

1) Open settings

[helpful link : How to open settings using different methods in Windows 10

2) Click on Update & Security

3) It will open the new window, select Windows Update on left pane..

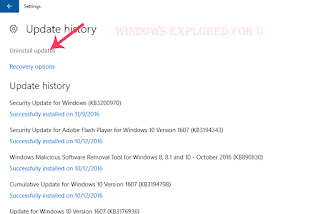
4) Now, on your right pane, you can find many options, select Update History

5) It will open a new window, Select Uninstall Updates


6) Clicking/tapping the uninstall updates will open a new window Installed Update on control panel,

there you can find all the updates installed on your system

7) Select the update you wish to uninstall

8) Click Uninstall.

If it asks for confirmation select Yes or follow onscreen instructions (as it may differ,depending on

update)

That's it..

Are you a beginner ? then below is a link to find all the beginner articles that may help you in

various stages and in mastering basics of Windows 10, just click on the below link to view..

Click to read all basic tutorials..

Cancel or clear print queue in Windows 10 - How to cancel or clear print queue in 2 step [Guide]

Cancel or clear print queue in Windows 10 - That's what we gonna see in this post.. If you feel your

Print job stuck in queue or if you wish to cancel print queue or clear print queue in windows 10 then

here is an guide that may help you to solve the problem.

Do you need any software ?

No, you don't need an software to cancel or clear print queue in windows 10

then, how to do it..?

There are lot of ways, available to clear or cancel the print job that stuck like we can use registry, command prompt,etc..

But, here is an method, that will help you solve the error in 2 steps..

Just follow the below steps..

Note : Sometimes, your Printer if it has buffer, might have already received items that needs to be

printed, so turn off your Printer, if you had ordered to print, before following the below steps..

How to cancel or clear or remove print queue in windows 10

1) First,Open powershell

[See : How to open powershell in Windows 10]


2) Type the following command

Restart-service spooler

3) Hit enter

That's it..

It will clear or cancel the print queue as we had restarted our printer service using the above step.

If you want to remove print queue, then go to the folder C:\Windows\System32\spool\PRINTERS

and delete everything inside there..

Hope it is helpful.

Are you a beginner ? then below is a link to find all the beginner articles that may help you in

various stages and in mastering basics of Windows 10, just click on the below link to view..

Click to read all basic tutorials..

Print Queue in Windows 10 - How to see what's printing in Windows 10 [Guide]

Print Queue in Windows 10 - How to see what's printing..- That's what we gonna see in this post..

In our last post, we had seen how to add a printer in windows 10, in this post let's see how to view

the print queue in Windows 10.

If you wish to know how to find what's printing or What's next going to print (in queue) then, i hope

this guide may be useful for you..

Do we need any software ?

No, we don't need an software to find print queue in windows 10..

then, how can if find it ..?

Just follow the upcoming steps..

1) Press Windows Key

2) Type devices and printers


3) Select the top most result, Devices and printers (Control panel)

4) It will open the devices connected to your PC.

5) Right Click on your printer device.

6) You will see different options, like Open, open in new window, See what's printing, set as default,etc..

7) Click on See what's printing..

You can find the print queue there..

That's it..

Hope it is helpful.

Are you a beginner ? then below is a link to find all the beginner articles that may help you in

various stages and in mastering basics of Windows 10, just click on the below link to view..

Click to read all basic tutorials..

How do i keep my computer up to date in Windows 10 [Solved]

How do i keep my computer up to date in Windows 10 - This is the question one of my friend asked

me.. He wished to know the way, that will update my computer for free, so here in this post, let's

see how to keep your Windows 10 up to date.

why is it important to keep your computer updated ?

Keeping your computer updated is essential because,  your operating system may be sometimes

served with bugs that are undiscovered or discovered. What they will do to fix the bug or error is

through this update.. the update differs from Application to application. But more commonly

updating the computer simply denotes the bug fix..

OK,but how to update my windows 10 desktop or laptop..?

Just follow the steps...

In Windows 10 PC, microsoft had included an option that does the job for us, which means windows

update can't be turned off unless some methods are followed. So normally when connected to

internet windows 10 will automatically keep your PC upto date.. Alternatively, you can check for

updates using the following method.

How to update windows 10 PC..

1) Press Windows + I Keys

2) Click Update & security

3) Click on Windows Update on the left pane..

4) You can find some options, on the right pane.. Find and click on Check for Updates..

How do i keep my computer up to date in Windows 10 [Solved]


That's it..

It will start downloading the Updates, if they are available..

Don't forget to connect your PC to internet before following the above steps..

Hope it is helpful.

Are you a beginner ? then below is a link to find all the beginner articles that may help you in

various stages and in mastering basics of Windows 10, just click on the below link to view..

Click to read all basic tutorials..

Screen Flickering in Windows 10 - Uninstall or update this apps that cause your display flash in windows 10

Screen Flickering in Windows 10 - Uninstall or update this apps that cause your display flash in

windows 10.

In our last post, we had see how to check whether screen flickering occurs due to incompatible app 

or display driver problem. Most of our friends find it useful.. But some of our readers went to next

level and said, the following apps are causing the display flash in windows 10.

So if you have problems, that causes screen flickers in windows 10 laptop, then you can uninstall or

update the following apps which may fix the display flash issue in windows 10.

Microsoft too, had mentioned those apps as their known apps that causes the screen flickering in

windows 10.


OK, here are the apps that cause screen flickering in windows 10..

1) Norton AV.

2) iCloud

3) IDT Audio.

These are the common apps that causes screen flickering in windows 10. So if you have those apps in your windows 10 PC, then simply uninstall and reinstall them..

This will fix screen flickering in windows 10.

Hope it is helpful..

Are you a beginner ? then below is a link to find all the beginner articles that may help you in

various stages and in mastering basics of Windows 10, just click on the below link to view..

Click to read all basic tutorials..

Screen flickering in Windows 10 - How to check whether display flash occurs because of driver or app in Windows 10

Screen flickering in Windows 10 - How to check whether display flash occurs because of driver or app in Windows 10 that's what we gonna see in this post..

In our last post, we had seen how to open task manager in windows 10 in this post,let's see how to

check screen flashing in windows 10 happens whether due to an incompatible app or the driver issue.

What are the causes for screen flickering in Windows 10 ?

Microsoft, says the Screen flickering in windows 10 usually occurs only because of two ways..

One is Incompatible app and the other is due to display driver problem.

OK, How to check it ?

If you think your windows 10 screen flashing occurs randomly or if you wish to fix laptop flickering

screen in windows 10. then the first step you need to do is to check whether it is because of windows issue or app issue.

So, in this post let's see how to determine the Screen flickering occurs because of Windows or incompatible app.

Do You need an software ?

No, you don't need an application to fix screen flickering in windows 10. That is , you don't need to

an software to check screen flickering in windows 10

then, how to do ...?

Just follow the steps below..

1) Login to your windows 10 PC

2) Open taskmanager

[See : How to open task manager in windows 10]

Does, your task manager flickers ? then it is because of driver problem. you need to update your display drivers.

[Helpful link : How to update display driver in windows 10
                         How to Update drivers in windows 10 ]


If your task manager doesn't flickers, then it is due to incompatible app, and you have no problem in

your PC.. just try closing and opening the app again,or reinstall the app it will fix the problem..

That's it..

Using the above method, you can fix windows 10 screen flickering on any windows 10 laptop and

windows 10 desktop.


Are you a beginner ? then here is a link to find all the beginner articles, just click on the below link..

Click to read all basic tutorials..

Open task manager in Windows 10 - How to open taskmanager in Windows 10 [ Beginner's guide]

Open task manager in Windows 10 - How to open task manager in Windows 10 using shortcuts -

That's what we gonna see in this post. We can open task manager using cmd, We can open task

manager using powershell, We can open task manager using search box, which clearly shows there

are lot of ways to open task manager in Windows 10.

Do you need to download Task manager for Windows 10 ?

No, you don't need to download task manager in Windows 10, as it inbuilt..

then, how to open it..

As, said earlier there are many ways, we can open task manager in windows 10.

However, i like to show only the basic method which is very helpful if you are beginner.


Method 1 :

How to open task manager using shortcut in Windows 10

1) Press Ctrl + Shift + Esc Keys on your keyboard.

You will get the task manager

Method 2 :

 How to Open task manager using search in Windows 10

1) Press Windows key

2) Type task manager

3) Select the top most result

Method 3 : using powershell

How to open task manager using Powershell in Windows 10

1) Open Powershell

[See : How to open powershell in Windows 10]

2) Type the following command

taskmgr

3) Hit enter

Method 4 : Using CMD

How to open task manager using cmd in Windows 10

1) Open cmd

[See : How to open cmd]

2) Type the following command

taskmgr

3) Hit enter

That's it..

This are the easiest ways you can open task manager in Windows 10.

Hope it helps..

Are you a beginner ? then below is a link to find all the beginner articles that may help you in

various stages and in mastering basics of Windows 10, just click on the below link to view..

Click to read all basic tutorials..

Windows keeps changing default printer in Windows 10 [Solved]

Windows keeps changing default printer in Windows 10 - That's what we gonna show in this post.

If you are using Windows 10 then you may had encountered this problem which our reader

experienced. He complained Windows Keeps changing default printer in Windows 10. and wish to

know something that will control it, whether it is through registry or powershell.

So,in this post let's see how to stop windows changing default printer.

Do you need any software?

No, we don't need an software to control those settings, as there is already an inbuilt option to do that

task inside settings.

so, you don't need to change or edit registry, run powershell commands and so on.

then, how to do it..

Just follow the below steps..

1) Open settings

[Helpful link : How to open settings using different methods in Windows 10]

2) Click on Devices.

3) Select Printers and scanners On your right pane,you can find many options,

4) Find the option Let Windows Manage my default printer

Under that, there will be a text "When this is on, windows will set your default printer to be the one

you used most recently at your current location"

5) Under that, there will be an option to switch it on or off. Select left side of the option, so that it

looks off.

Windows keeps changing default printer in Windows 10 [Solved]


That's it, it will fix the problem..

Hope it is helpful.

Set default printer in Windows 10 [Guide]

Set default printer in Windows 10 - That's what we gonna see in this post. if you wish to set default

printer in Windows 10, then here is an guide that may help you.

Do you need to download software to set default printer in Windows 10 ..?


No, you don't need to download software to set default printer in Windows 10.

set default printer in windows 10

then, how to do it..?

just follow the steps below..


How to set default printer in Windows 10


1) Open settings

[Helpful link : How to open settings using different methods in Windows 10]

2) Click on Devices.

3) On your right pane,you can find many options,

4) Click on the device, you wish to set default printer and

set it as default.

That's it..

You can also set default printer using ..

Open devices control panel, and find your printer device and select set it as default.


Are you a beginner ? then here is a link to find all the beginner articles, just click on the below link..

Click to read all basic tutorials..

Update drivers for Windows 10 - How to update drivers in Windows 10 [Updated]

Update drivers for Windows 10 - How to update drivers in Windows 10, that's the post we are gonna

see in this post..

Works on Windows 10

Creators Update, Windows 10 Anniversary Update, and other editions of Windows like Windows 10

earlier builds like Aug 2015 and Nov 2015 builds...

Do you need any software ??

No, we don't need an software to update drivers in Windows 10. However, if you need to download

all drivers for windows 10 using a software , then you can search google or bing for Windows 10

update drivers free download and find some tools to install them. Ignore the payable items and

simply download freewares and that too a trusted one.. But i recommend you to install updates only

through device manager and windows updates, as it is the only one you can trust for sure.

How to update drivers in Windows 10 

Just follow the below steps..

1) Open device manager.

[Helpful link : How to Open Device Manager in Windows 10

2) It will open device manager

3) On your device manager, it will see different options like Audio inputs and outputs, Batteries, Computer,etc.

4) Expand by clicking > this sign.

5) When you expand, you will see the appropriate driver for that device..

Right click on the driver, you will see different options like Update Driver Software, Uninstall, etc..

6) Select Update Driver Software.

                                        Can't adjust Screen brightness in Windows 10 desktop and laptops [Solved]

Pic : Sample image to update display driver..

7) It will display a new window

"Search Automatically for Updated driver Software" and Browse my computer ...etc.

If you have already downloaded your driver like Intel or NVIDIA, simply click on browse

my computer for driver option and select the location of that driver,else

click on search automatically for updated driver software option

8) Connect your PC to internet.

9) It will automatically download the relevant update through Windows Update now..

After it finish, you will see the driver was updated.

That's it..

Are you a beginner ? then below is a link to find all the beginner articles that may help you in

various stages and in mastering basics of Windows 10, just click on the below link to view..

Click to read all basic tutorials..

Lineage OS will be the successor of Cyanogen mod

Lineage Operating System is the new operating system for cyanogen Android users. Cyanogen the

revolutionary mod released for Android operating system declared, they are shutting down on Dec

31, 2016. The news made everyone who loves cyanogen into tears. Since, the news spreaded like

fire, the community who are a part of Cyanogen decided to bring the Cyanogen back to life, by

releasing a new version of Operating System, they named it as lineage OS.

As, of Dec 25,2016 (the day this post was written) we don't know whether this lineage os will be a

continuity of Cyanogen mod or they will develop into a entirely new Operating System.

But, they made hint that, cyanogen won't be leaved as it is.

They said, users like us can follow them on

Their official site

Facebook

Twitter

I also have no idea about when this Operating System will be released or when  we can download

lineage os . But one thing is sure we are not left by them, as they will continue to develop the mod

and will release As soon as Possible..

Good bye Cyanogen ! - it's time to welcome "Lineage" as Cyanogen initates its shutdown timer

Cyanogenmod is no more...


If you are a fan of Android, then probably you may heard about this name Cyanogen the brand that 

looked promising to replace android right from the start..

If you have never heard about this name, then it's time to know something about this..

Cyanogen was the Operating system designed by professionals by reconstructing the android source 

code..

It's like a mod that looked promising for both the users and professionals, as they provided additional 

facilities the traditional android operating system lacked..

But, the company has decided to end their campaign, as it initiates its shutdown timer.

The company said, cyanogen services will be no longer available after DEC 31, 2016.

they also said, they have taken the steps necessary to produce a fork of the CM source code and 

pending patches.

Thanking its users and the community, cyanogen said they were moving towards Lineage, the 

android distribution OS and will build its legacy from there.


Good bye Cyanogen😢😢.!

Add a printer to Windows 10 - How to [Guide]

How to add a printer to windows 10 ? how to install printer in windows 10, how to connect printer to

computer, where is my printer in windows 10 ? - that's the question people usually ask around the

forums. So,i decided to create an separate post to guide how to add a printer in windows 10.

1) Login to your Windows 10 PC

2) Open settings

3) Click on devices.

4) On your right pane, you can find Add a printer or Scanner

5) Click on Add a Printer or scanner


Add a printer to Windows 10 - How to [Guide]


Normally, windows will automatically detect your Printer when you plugged in, you can find how to 

add a device post [Link] if you can't find your device listed even after using the above method, then continue reading the post..

6) Note : if your printer was detected, then follow the onscreen instructions( which will be mostly revolve around you clicking Next, next,etc)  it varies on the device.

7) If your PC can't find the printer, then Click on the Printer that i want is n't listed option.

8) It will open a new window, find printer by other options click on Add a local printer or network Printer with manual settings button.

Note : If you wish to add wireless printer to windows 10 , then Click on "Add a Bluetooth, wireless or network discoverable printer.

9) Continuing step 8, it will ask you to select printer port,( on choose a printer port window).

Here, if you don't know about computer's much, don't alter anything simply click next.

However, if you are little bit advanced user, then customize it by selecting a port on Use an existing port drop down list.

10) Click Next.

11) It will open Install the printer window.

It will display the manufactures column on left pane , and your device model on the right pane..

In this step, select your Printer company and your Printer model and click Next.

This process is best suitable for beginners as they don't need to everything, windows will take care 

all for them, using windows update.

Recommended for intermediate and advanced users..:

If, you have disk (that comes with your Printer), then insert it, and click Have a disk option (on the step 11 window), browse the drive and select the printer's driver.

12) It will now open Type a printer name,type if anything you need to change,else simply Click Next.

13) It will now open "Printer sharing" window, Make sure "Share this printer so that others on your 

network can find and use it " option is selected if you wish to share your printer in network, else 

simply select do not share this printer option.

14) Click Next.

15) Now, it will load the final page, click on Print a test page button to check your Printer was 

successfully installed and test.

16) Click Finish.

Like this you can connect any printer to your computer and other PC's..

That's it..

Are you a beginner ? then below is a link to find all the beginner articles that may help you in

various stages and in mastering basics of Windows 10, just click on the below link to view..

Click to read all basic tutorials..

Add or connect device to a Windows 10 PC - How to do [Guide]

Add a device to a Windows 10 PC - That's what we gonna see in this post. When you are in a
position to add some device to This PC then you can use this guide to add a device to windows 10
PC.

How to add ?

Normally, windows will automatically add a device when it detects there is a device, which means it detects or initialize when you plugin or turn on your device.

If your Windows 10 PC can't detect device, then you can add it using the way below.

1) First, Check on the action center.

[See : What is Action center and how to open it in Windows 10]

2) When you opened, your action center you can see your device being listed by notification.

Click on it.

3) If there is no notifications, then Open File explorer

If you find your device there, then your device was already detected by Windows 10.

If you can't find device, then you need to add a device manually.

See the below steps to know 

How to add a device to windows 10 PC.

1) Press Windows (logo) Key on your keyboard.

2) Type devices

3) Select devices and Printer on the top most result.

Add a device to a Windows 10 PC - How to do [Guide]


4) It will open a new window on the control panel.

You can add device and printer on this window.

5) Select Add a device.

6) Plugin your device and follow the onscreen instructions, because it may vary for device to device.

That's it.

Hope it is helpful.

Are you a beginner ? then below is a link to find all the beginner articles that may help you in

various stages and in mastering basics of Windows 10, just click on the below link to view..

Click to read all basic tutorials..

17 Diseases this device will detect based on your Breath😲😲 !

Looks like we are moving back again to old age. A team of scientist headed by Professor Hossam
Haick, said they can detect 17 diseases using the way you breath. This was a principle used by
Hippocrates who said his students to detect the disease based on their breath., and that happened
before 400 BC.


Well, here is how they claim it works..

The analyser will determine the amount of chemical composition that your  breath has, which was
exhaled by your body. They say the exhaled breath will contain several elements like Carbon dioxide, Nitrogen, and other 100 elements. And it is enough to detect the person's health.

At first ! i too wondered how it is possible.! but after finding some research, i found out, a thing when our health was affected the amount of chemicals exhaled will vary.

Using the above idea, they had developed this device, which showed 86% accuracy..

Here are the 17 diseases that it can detect..

lung cancer, colorectal cancer, head and neck cancer, ovarian cancer, bladder cancer, prostate cancer, 
kidney cancer, gastric cancer, Crohn’s disease, ulcerative colitis, irritable bowel syndrome, idiopathic 
Parkinson’s, atypical Parkinsonism, multiple sclerosis, pulmonary arterial hypertension, pre-
eclampsia, and chronic kidney disease.

This tool has an added advantage, which is it can detect additional disease, even one disease is
already present.

These, tool is now only available as Research paper (even the professor said, the aim is to develop
breathslayer like portable technology.also he indicated that it could reach clinics soon. some sites
report the device could be priced at 24 Euro.

You can find the read the whole publication using the link below..

[Official link [Opens in new window]]

Let,the Future begins..✌✌