November 2016

How to delete Quick Access History in Windows 10 [Updated]

Quick Access is the option used to quickly access our favorite folders or files. But they hadn't

included an option that asks us is this files need to be displayed in quick access or not, atleast it

would be better for some if they had designed without quick access as well. But they hadn't done

that, instead they did a program inside windows which will automatically display the recently 

opened files in quick access of Windows 10.

So,if you wish to delete quick access history of Windows 10 or clear quick access history of

Windows 10 (i think both are same😕) here is an guide on how to do.. Remember you don't need

registry or gpo to carry out the following task.

How to clear or reset quick access recent files history in Windows 10

1) Press Windows + E Keys ( it's a shortcut for Opening This PC)

2) Click on the File tab, which will be on the top left corner

3) When you clicked it will display open new Window,Open command prompt,etc options..

Click on the Change folder and Search Options.


4) it Will open a new window, named folder Options.

On that,click on the general tab and find an option called Privacy

5) under Privacy, you can see two checkbox options

Show recently opened files  in quick access and show frequently used folders in Quick Access

6) Just uncheck the boxes and click Apply and OK.

That's it..


Turn live tiles on or Off settings in Windows 10 - How to [Updated]

Windows 10 has an option like its predecessor Operating System known as live tiles.

What is live tiles in windows 10?

This live tiles are nothing but the option used to display the latest updates about the particular task 

like update change in Weather using this live tiles. this will consume our bandwidth by running on 

our Background.

lot, of us don't like this live tiles because of the above reason,but there are some people who likes it 

mainly for their usefulness. 

So, in this post let's see how to turn on live tiles on Windows 10 if it was not working and how to 

turn off live tiles in Windows 10.

How to do it...?

Just follow the below steps.

How to turn off live tiles on Windows 10

1) Click on the Start button

2) It will display the live of items on the right pane

3) Right click on the tile you wish to turn off

4) It will display options like unpin from start, Resize and More,on that click on More.(See screenshot posted below)

5) Now,you will find the option "Turn live tile on or off" or turn live tile off  Click on it..

6) It will change into the Normal icon,which confirms your live tile is OFF.

like this, you can turn off all live tiles on Windows 10 desktop, also you don't need gpo or registry to turn off  or reset this live tile.

How to turn on live tiles on Windows 10

1) Click on the Start button

2) It will display the live of items on the right pane

3) Right click on the tile you wish to turn on

4) It will display options like unpin from start, Resize and More,on that click on More.

5) Now,you will find the option Turn live tile on  Click on it..


6) It will now change into different icon,which confirms your live tile is ON.

Note, if  Windows 10 live tiles is not working, then you need to makesure the live tiles will work for that app/option, for example We can't set live tiles for Alarm and clock.

That's it✌✌..

Hope it is helpful.

Resize the start menu or Taskbar in Windows 10 - How to

Start menu is the one we use when we need to any task on our PC, that's why Microsoft too had

included some options in the start menu itself. Those items include all apps in Start menu or

"Opening Settings" everything using the start menu. But the problem is not everyone likes the 

start menu of Windows 10 ( even i hate sometimes) i found most are like me who wish to resize the

start menu which made me to write this post.

How to resize the Start menu in Windows 10

Resizing start menu is an super easy way,just do as follows on your PC

1) First,click on Start button of Windows 10

2) Move your mouse to the corner either to the right side or top of Start menu

3) You will find the ↔ icon which shows we are doing right, now simply drag to the size you want. for example if you don't want horizontal right side space much longer, then simply drag it to the left side.

4) The same case can be applied when you want the start menu size to be smaller, move your mouse to the top of start menu the <-> icon pointer will appear simply drag it to bottom/top.

That's it..

If your Start menu screen is full screen, then follow the below link and follow the steps shown on

that article.

How to Increase taskbar height in Windows 10

1) First, move your mouse near to the top of taskbar

2) You will find the ↕ icon which shows you are doing right, now simply drag to the size you want. for example if you don't want more space below vertically, then simply pull it to top.


If you wish to reduce taskbar height in Windows 10, then

1) First, move your mouse near to the top of taskbar

2) You will find the ↕ icon which shows you are doing right, now simply drag to the size you want. for example if you don't want more space at top, then simply pull it to down.


That's it..

Recommended article :

Taskbar showing on top of Full screen in Windows 10,especially while watching videos - [Solution]

Windows 10 Not opening WiFi login Pages [Solved]

Today, while i wish to connect to a hotspot on my locality i had came up with a strange issue, the 

WiFi adapters that worked fine suddenly started to mess up, i was unavailable to connect to any login 

pages of WiFi. Initially i thought the problem was with browser settings and did reset. But that 

went avail. I began to search for every possible solutions and found one setting as the culprit, which i 

like to share it here.

If you are experiencing similar issue, then try this option which worked for me.

Did i used any Special or third party softwares ?

No,i just changed an Option in settings.

What option do you changed ? and how ?

Just follow the below steps..

Cannot open WiFi login Pages in Windows 10 - How to fix

1) Press Windows + I keys.

2) Click on Network and Internet

3) It will open a new window, on that select WiFi on the left pane.

4) Now,look for an option on the right pane Hotspot 2.0 networks

Windows 10 Not opening WiFi login Pages [Solved]


5) Below, the option there will be a button to toggle "Let me use Online Sign-up to get connected"

6) click\tap on the right side of the option to set it to ON

7) Now,try it will work, if possible Restart your PC ( i had done that).

That's it..

I used the above steps, it worked for me so i shared here, if it doesn't help, then try disabling the Antivirus or  firewalls or  type the login  page address on your address bar.

Hope it helps.😐

How to Change default Voice for Speech recognition [Windows 10 Anniversary Update tutorial]

The Best Operating system should satisfy the users,with Windows 10 Claiming to be the best User

friendly operating System we have options to change everything either through settings or through 

the registry tweaks. One of the best feature available on Windows is its speech recognition. We can 

access Speech recognition through control panel in our Windows 8.1 and 8 devices. but such 

scenario was replaced in Windows 10 as most of the things are migrated to Settings App, which 

makes to search for every settings that resides in Windows 10 . One of such option is speech 

recognition, the option used to speak what we typed.

So,in this post let's see how to change the voice used in the Speech recognition of Windows 10.

Since,most of the things are directly affect on Apps, changing the default voice will affect the voice 

in Apps like Microsoft Office.

How to change voice in Microsoft Office and Windows 10 :

1) Press Windows + I keys.

2) Click on Time and region

3) It will open a new window with Date & time.

4) Select Speech option "Which will be on left pane"

5) When you clicked, it will land you to Speech options

6) Find Text to Speech Option ( Which will be on your right pane)

7) Click on Voice.


8) It will display the list of Voices supported like "Microsoft David Mobile", Microsoft Zira 

Mobile, Microsoft Mark Mobile "

9) Select the voice you wish to set.

10) And click Preview Voice to preview.

That's it..

Now,your system's voice will be changed to the one you selected now.

How to Pin a Website to taskbar or Start menu of Windows 10 [Chrome and Edge]

If you wish to Open your favorite website by a simple click on the taskbar, then here is your guide.

What kind of Websites can you Pin to taskbar?

you can pin any website like google,Windowsexploredforu,bing to the task bar. And you can use it

with any browser like chrome.

Do you any need software to pin website to taskbar?

No,we don't need any software to pin website to taskbar in windows 10.

Then,how to do it?

Just follow the below steps..

1) Login to Your Windows 10 PC.

2) Open your Browser..

How to pin a website using Microsoft Edge in Windows 10 

1) Open Microsoft edge

2) Open the site you wish to add to taskbar ( for example : Windowsexploredforu.blogspot.com)

3) Click on the ... icon in the Microsoft edge ( Which will be available below to X Mark ( Close Window icon)


4) It will display a drop down menu, on that select Pin to Start Option.

Now,Windows will display a warning " this App is trying to pin a tile to start" and Asking you to select "Yes" or "No" Option,Select Yes

5) Now right click on the Icon on the start menu and select Pin to taskbar

That's it..

How to pin a website to taskbar using Chrome in Windows 10 

1) Open chrome browser.

2) Open the site you wish to add to taskbar ( for example : Windowsexploredforu.blogspot.com)

3) Now,click on the three dot icon available below to X mark ( Close window)

4) When you clicked,it will display the drop down menu, on that find and click on More tools Options

5) Click on Add to desktop option.


6) Click "Add" ,when it asks for confirmation

6) Now,visit your desktop,you can find the a the website's icon ( which you find on the top left corner above to the address bar) on your desktop icon ( Which when clicked will direct you to the website)

7) Simply right click the desktop shortcut and select Pin to taskbar (or) simply drag and 

drop to taskbar.

That's it.

To unpin a site from taskbar just right click on the icon and select unpin from taskbar

How to auto Shutdown your Windows 10 PC at particular time😎😎😎

Everything can be accomplished in Windows when we know the right way to do it, that's Why its

called user friendly Operating System. Windows 10 being the addition of new features have lot of

such things, one of such things is the ability to shutdown our Windows 10 PC at a specific time.

When you follow the steps shown below, it will create a shutdown timer in windows 10 PC. You

will then say hey, my windows 10 shutdown's automatically.

Do you need any third party Software?

No,we don't need an additional software to do this auto shutdown on Windows 10 PC as such

options are inbuilt inside our PC, we don't need an auto shutdown app for Windows 10, Also you

don't need to know shutdown commands to turn off Windows 10 PC and execute on cmd,  as i

had explained the easiest way in this post.

How to do it ?

Just follow the below steps..


[To assist you better,i had created the above video tutorial,refer it when you lost in any step]


1) Press Windows Key

2) Type task scheduler

3) Select the top most result "task scheduler (deskop app)"

4) Click on Create a basic task on the right pane.


5) It will ask you to select the name the task, type any name you want,

for example : type shutdown my precious PC

Click Next

6) Now,select the Trigger action when you need to shutdown whether you need to shutdown daily or weekly on that time.

Since, we are using the specific time in our guide, just choose "One time"

7) Select the date on the next window that appears and also the time..

" the time will be calculated by windows based on the system time"


How to Shutdown your Windows 10 Computer at particular time


8) If you wish you can choose "Synchornize with all my time zones option"

9) Click Next.

10) Now, it will display action, on that select Start a program and click Next.

11) It will now, ask you to select the Program /script on that type the following line.

C:\Windows\System32\Shutdown.exe

12) Click Next.

13) Now,verify your details and select Finish to finish.

If you wish to change any option then simply,select back option to get back and edit.

Related :  How to fix Shutdown issues on Windows 10 PC

How to pair or connect Bluetooth devices in Windows 10

In our last post, we had seen how to get back the missing Bluetooth in our Windows Anniversary update build .

Connecting to Bluetooth doesn't stop there. We need to pair the Bluetooth to the device  to transfer
media or play media continuously. So in this post, let's see how to pair a Bluetooth device in
Windows 10.

First make sure your device has Bluetooth turned on. And also if you are about to pair Bluetooth headset with laptop or if you are about to pair Bluetooth speaker on windows 10 ,then make sure the device is within range.

Else, Windows 10 will display no Bluetooth or Bluetooth device not found or will keep on searching for the devices..

Once, you had confirmed the above, then follow the below


Steps to pair the Bluetooth device in Windows 10.


1) Press Windows + I keys.

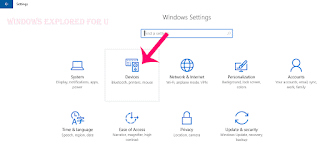
2) Click on devices


3) It Will open a new window, on that select Bluetooth( Which will be on left pane).

4) Set it to turn on by tap/click on the right side of the option.

5) Now, Bring the receiver device near to your machine (with bluetooth turned on),

6) Windows will now show the list of devices that are ready to pair or paired.

7) If you wish to pair,then simply select the device you wish to pair and click Pair.

8) It will show connected once it has done. 

That's it..

You have done .!

Update: Latest Windows Editions will have an option to pair bluetooth in single step. Just select the action center/ Notifications icon on your taskbar and select connect button, it will show the available devices, Pair and enjoy.

Cortana - Sync Notifications on Windows 10

Windows 10 Anniversary Update,sports a collection of new features is well known, Everyday we are

exploring some of the great features and some common errors that happen in our PC like shutdown

issue, blutetooth option missing,etc. in this post let's see how to Sync notifications on Windows 10

using cortana.

What you need ?

First, You need to turn on cortana on your device if you had turned off.,then if you planned to sync

notifications between your android phone and Windows 10 PC, you need to install the Cortana apk

from Playstore for this to work.

Also your PC must have latest build of Windows 10 ( Windows 10 Anniversary Update build, while writing this post)

How to do it ?

Just follow the below steps..

Open Cortana on your PC( Which you can find by clicking on the search box)

Find the Settings gear icon and click it,it will display some options like your Microphone Option

turned on, Let Cortana respond to "Hey Cortana",etc options

Scroll down and find Send notifications between devices option.

If you wish to disable sync notifications between devices ,then click on the left side of the option to

turn it off.


Also,if you wish to turn on cortana sync with android phone, then turn it to ON by clicking/tap right

side of the option.

In order to mirror your notifications (Cortana notifications mirroring) or cortana Sync with your

Phone, then you need to turn on an option on your android phone to sync cortana with android.

How to get android notifications on windows 10 using cortana..

1) install the cortana app on your mobile phone

2) Sign in to the App

3) Click/tap on the settings

4) It will open the same Hey Cortana option on your android device, scroll down and find the

"Sync Notifications" option, tap it.

5) It will show the list,  choose the options which you wish to sync. for example : if you wish to sync

missed calls,then enable by tapping  "missed calls notifications" on your android device.

6) In the same way,if you wish to sync whatsapp notifications of your android device to 

Windows 10 PC, then click on the App Notifications Sync Option  and choose WhatsApp on 

the list of devices.

7) On the other hand, if you wish to disable sync notifications of cortana, then simply turn off the

options by a simple tap over the options ( a tick mark shows it is enabled and if there is no tick mark

on the box then, it is disabled)

That's it.

Other Articles ...

How to disable like what you see option on Windows 10

Good Bye ! Cortana, how to disable cortana after Windows 10 Anniversary Update

Click to check latest windows 10 help articles

How to Open Device Manager in Windows 10 [Guide]

Open device manager and update your drivers, that's what we suggest when we have errors related to

drivers, but we fail to say how to open device manager. While Opening device manager is like

turning on light switch for most of the regular users( that much simple). there are still people who

find difficulty in accessing device manager. Whether if you are novice or new to Windows don't

worry, here are some easiest ways to

open device manager in windows 10.

What is device manager in windows 10 ?

Device manager is the place where all our device's components will be registered, which means its the link for executing the program codes ( that's we call drivers), Windows will use the device manager feature (an application) to check the available devices inside the PC.

If you insert a USB to copy or transfer files, then it would first get regsistered on this device manager,then only we are notified like " a new device was detected,scan to fix,etc.. message"

Ok,Where is device manager located in Windows 10 ?

Device manager and other components are located inside the Windows directory usually System32 folder.

How to access or open device manager in Windows 10 ?

there are many ways available as said earlier, but here in this post let's see the easiest ways to open device manager in windows 10.

How to Open Device Manager in Windows 10 [Guide]


Method 1 : Using Run Command

1) Press Windows + R Keys simultaneously

2) Type devmgmt.msc

3) Hit enter

It will Open device manager,

Pretty simple huh ?

Method 2 : Using search 

1) press Windows Key

2) type device manager

3) select the top most result

It will Open device manager,

If you wish to open device manager only through CMD,then here is the way.

1) First, open CMD.

[See : How to open cmd in different ways]

2) type devmgmt.msc

3) Hit enter.

That's it,,

This are the easiest ways to open device manager in Windows 10 ,and the great thing is this method

will work on any edition of Windows 10 and also in previous version of Windows like Windows 8.1

and Windows 8.


Forget WiFi network in Windows 10 - How to guide [Updated]

Forget wifi network in Windows 10, how to do? that's what we're going to see in this post. If you had forgot WiFi login password or if your WiFi is causing some issues, then you can try this and reconnect to fix the issue.

WiFi seems to be a big deal in our World, with the development of rapid technology, we can see
WiFi network everywhere. In fact, More number of People chooses to go where  WiFi is available,
such a situation was created by the technology. but if Our Network seems to be connected and there
was no connection then, the possible and basic solution we and other Persons ask you to do is to forget your network and re-try to connect your network. Enough said, let's dig-in.

How to forget a WiFi network in Windows 10.


Just follow the steps..

1) Press Windows + I which will open settings.

2) Select Network & Internet.

3) Click on WiFi tab on the left pane.

4) Click on Manage Known Networks on the Right pane ,the option will be available below to Hardware properties and above to WiFi sense.

5) It will display the list of WiFi networks you had connected with your PC.

6) Click on the network you wish to forget

How to forget a WiFi network in Windows 10 [Updated]


7) Click on Forget

8) Close the Window.

That's it..

Other posts :

#MWC 2020 what it is ? where to register ? and where its going to take place/location ?

Display driver has stopped Responding and has recovered error in Windows 10 [Fixed]

Whenever we play high graphic games or use that kind of softwares,our PC will produce a strange

error Stating "Display driver has stopped responding and has recovered" this error message also

suitable when your PC hangs temporarily or become unresponsive for a moment.

So,if your PC does such tasks,then here is your guide on how to fix it..

Follow the steps below..


First,update your display drivers of our PC

Step 1 : Login to Your Windows 10 PC.

Step 2 : Press Windows + R Key simultaneously.

Step 3 : Type devmgmt.msc

Step 4 : Hit Enter.

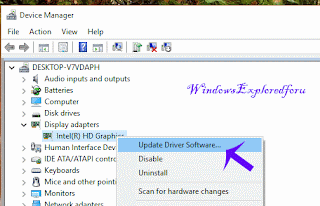
Step 5 : Click on Display adapters.

Step 6 : Under that you Will find display driver installed on your PC.

Step 7 : Right Click on it and Select "Update driver Software".

Step 8 : Connect to internet and Select "Search automatically for updated driver 

Software" option.
Step 9 : Restart after installation.

If it says,the driver is in already updated, then try Roll back driver option, which will be on Properties tab ( Click on Properties,instead of Update driver software while on Step 7)

Check whether Graphic card performance is set to Maximum..

Step 1 : Login to Your Windows 10 PC.

Step 2 Open Control Panel.

Step 3 : Click on Hardware and Sound.

Step 4 : Click on Power Options on the right pane.

Step 5 : Click on Change Plan settings,on the right pane.

Step 6: Click on change advanced Power settings.

Step 7 : Scroll down and you can find your graphic card there,click on it..

How to Fix video tdr Failure error in Windows 10 [ Solved]


Step 8 : Expand it, and set it to Maximum Performance -> from balanced.

Step 9 : Click on Apply -> OK

Step 10 : Restart your PC.

Do the following registry tweak..

1) Press Windows + R keys -> type regedit

2) Navigate to following directory..

HKEY_LOCAL_MACHINE\SYSTEM\CurrentControlSet\Control\GraphicsDrivers

3) Now,right click on the empty area of right pane it will display options like

Collapse,New,Find,Delete,etc.. on that 

select New - > DWORD(32-bit) Value..


4) Name it as TdrDelay

5) Double click on it and set its value data to 8 (or) 9.

6) Click OK.

7) Restart your PC.

That's it..

Now,your problem will be fixed,if not then that game/software may had messed up with your computer, Uninstall and reinstall the program to fix the error.

The above solution works for following errors..

display drivers stopped working windows 10, display drivers stopped working and has recovered windows 10,display drivers stopped responding and has recovered error in windows 10,display driver has stopped working windows 10,display drivers stopped responding and has recovered error in windows 10 nvidia,display drivers stopped responding and has recovered error in windows 8,tdrdelay windows 10

Shutdown problem in Windows 10 Laptops & desktop [Solved]

Windows 10 the best Operating System for User Interface, it has variety of useful features but the

problem is they hadn't take care of the basic things like shutdown, bluetooth,etc. Either those options

won't be available or they will keep freezing. One of such issue is the shutdown problem.

The shutdown issue is because. Windows 10 uses a new technology known as "Hibernate shutdown"

which will help our PC's kernel ( heart of Operating System) to simply hibernate resulting in faster

shutdown and faster startup.

[See : How to disable Start up apps like pro]

Do you need third party softwares?

No,just configure the following option on your PC

What you need to do ?

Just follow the below steps, note if you are currently struck on the Shutdown window,then

Press and hold Power button for 10 seconds, it will Shutdown your desktop and laptop

if that fails,remove your battery if you are using laptops or turn off your power Supply allowing it to

turn off.

After,that restart your PC as usual, and follow the below steps.

1) Press Windows Key

2) Type Power Options

3) Select the top most result.

4) On your left pane,there will an option called "Change What Power Button does",click on it.

5) Click on Change Settings that Are unavailable on the Window that Opens.

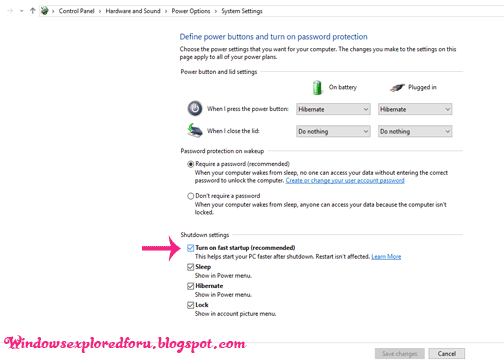
Under shutdown settings,there will be option called Turn on fast startup (Recommended),

Uncheck the box

Turn on or off Fast Startup in Windows 10

6) Click Apply

7) Click OK.

If you need you can re-enable it later using the steps shown in this post..

That's it..

The above Solution works For following Errors..

shutdown issue in windows 10,shutdown issue in windows 8, shutdown issue in windows,shutdown problem  in windows 10,windows 10 computer won't shut down,windows 10 won't shut down completely,windows 10 shutting down stuck, can't shutdown windows 10,windows 10 not shutting down completely,windows 10 desktop won't shut down,windows 10 shuts down randomly

How to change default Printer in Windows 10

Printer is the most helpful tool ever discovered in the 20th century, and even now there are still

people with us who use printer randomly. Windows 10 which have the bluetooth option

changed,

fortunately hadn't made the printer option unavailable, which helps us to make the work easier.

In this post,let's see how to change the default printer in Windows 10

1) Press Windows + I keys.

2) Click on devices


3) It will open the list of devices connected to your PC,select your Printer

4) Now,click on Make it default

That's it..

We also can choose the last used printer as default printer,for that set the Last used printer option 

to ON.

Related Articles ..

How to find your windows 10 license key

Video tdr failure error - how to fix

Touch pad not working in Windows 10 [Fix]

When you install Windows 10 the first problem you see will be no touch pad or mouse pointer (that

was the case on my friend's acer laptop) first i checked whether actually touchpad was there

(by following the step to install the windows 10 manually, the mouse pointer appeared there,but not

when i booted into Windows 10 desktop). I fixed by following the most common steps i will do

when such error happens, Which i like to share in this post, So if your touchpad was not working

then follow the steps in the below post.

Requirements... :

You don't need additional third party softwares,but you need internet connection to download driver from internet.

How to do it ..

Just follow the steps.

Use Tab keys to move between options,and enter to select.

1) Press Windows + I Keys.

2) select  Devices

3) Select Mouse and Touchpad settings on the left pane

4) Now,on your right pane, you will find the option Addtional mouse settings, click on it.

5) It will Open Mouse Properties, click on the Device settings.


6) Makesure, the device was enabled if it was disabled,then

select the device and click on Enable.

7) Select Apply,

now your mouse pointer will appear, Click OK and Close the window.

Update device software..

1) Open device manager.

[ Press Windows + R Key,Which takes us to run Command.

Type devmgmt.msc Which Will take You to device manager.]

2) Click on the name of your device( You can expand the mice controllers and other 

pointing devices)  right click,select Update driver software.

.

3) Connect your PC to internet and select Search automatically for updated device software 

4) wait for some time it will update the latest driver software.

5) Restart your PC.

That's it..

I hope it is helpful.

works for the following errors..

touchpad not working in windows 10,touchpad not working properly,touchpad not working in windows 10,touchpad not working in lenovo windows 10,touchpad not working in windows 10 acer laptop,touchpad not working in windows 10 dell,touchpad not working in windows 10 hp,touchpad not working in windows 10 acer

Bluetooth Missing in Windows 10 [Solved]

Bluetooth, the technology helped to connect our devices from long time. The ability to turn on or

turn off bluetooth option included in the first windows 10 Option got a change in the Windows 10

Anniversary update, I don't know why it was discontinued, the Option will be available under

devices of Settings page. But Such things as said earlier, was changed in further builds particularly in

windows 10 anniversary update it got massive change, so in this post let's see how to get back

Bluetooth in Windows 10.

Requirements..

Your PC must have Bluetooth device inbuilt or you need Bluetooth external device.

How to do it..

Just follow the below steps..

Method 1 :

1) Press Windows Key

2) Type troubleshooting

3) Select the top most result


4) It will open Control panel,on that select Hardware and Sound

5) Click on Hardware and devices Troubleshooter.

It will open troubleshooter, click on Advanced tab, make sure Apply repairs automatically is checked.

6) Click On next


7) Wait for sometime,it will search and will display your hardware or will fix the device.

8) After that, you can see your bluetooth device.

Method 2 : Update your device drivers..

1) Open device manager.

[ Press Windows + R Key,Which takes us to run Command.

Type devmgmt.msc Which Will take You to device manager.]

2) Click on the name of your bluetooth device right click,select

Update driver software..

3) Connect your PC to internet and select Search automatically for updated device software 

4) wait for some time it will update the latest driver software.

5) Restart your PC.

Solution 3 :Turn on or off Bluetooth Using Control panel of Windows 10...

1) Press Windows Key

2) type View network connections

3) Select the top most result,which will open the option in control panel.

4) Your bluetooth device will be there,right click on the device and select disable

if you can't find it then, follow the first 2 methods shown above and follow the above solution 3 steps

You can always connect using connect option on the action center( Windows + A keys -> Connect) 

Hope it is helpful.

The above steps Works for following errors:

bluetooth missing in windows 10,bluetooth missing in windows 10 anniversary update,how to turn on bluetooth in windows 10, bluetooth option suddenly missing on Windows 10,bluetooth missing from device manager,bluetooth missing in windows 10 settings,bluetooth not in device manager windows 10,no bluetooth in device manager windows 10,install bluetooth windows 10,windows 10 bluetooth not showing,windows 10 no bluetooth settings,bluetooth missing after windows 10 upgrade, bluetooth missing after Windows 10 update fix.

How to remove or disable admin password in Windows 10 [Guide]

Password is one of the best way to protect our PC, everything has password implemented now,

whether it may be a credit card or your WiFi network,everything has password ,What if We had

forgot our Password, incase it's for cards, we need to contact our bank and ask them to reset. But

such things cannot be done with PC's.So in this post,let's see how to remove admin password when

you are using Windows 10 PC.

Requirements :

Since,we are not gonna remove the admin password it is essential to remove atleast your PIN or you must be logged in to your admin account.

How to do it...

Just follow the below steps..

1) Press Windows + X and select Command Prompt ( Run as Administrator]

Does,your Windows 10 has no command prompt,only powershell there, on pressing Windows + X key menu??, Don't worry follow the steps shown in this link,to get back the command prompt on Windows + X menu

[How to get back command prompt on Windows + X menu of Windows 10]

[Also see : How to run cmd as administrator in different ways]

2) Once you are at command prompt type the following command

net user 

How to remove or disable admin password in Windows 10 [Guide]


3) it will display the list of accounts on your PC, note your account name which it shows Administrator text near it.

4) Now,type the following command

net user (your account name) *

for example : if your account name was logesh,then type net user logesh *

5) Hit enter.

6) Now,it will ask you to enter password and confirm password, Don't enter anything,simply press Enter key twice

7) It will now say,command created successfully

If it says, System error 87: Access is denied or something related to that,then run cmd as administrator again and follow the above steps again.

How to remove or disable admin password in Windows 10 [Guide]


If it says,The system is not authoritative for the specified account then possibly you had signed in using Microsoft account, sign out from the Microsoft account and try the above steps.

That's it..

Your password was successfully removed.


video tdr Failure error in Windows 10 how to fix ! [Solved]

In Windows 10 most of the errors are very difficult to understand,this tdr is one of those complicated

error which can be fixed using a simple solution.

First,if you are wondering what is tdr,then it means timeout, detection and Recovery. It is a

component in windows which detects the video card driver failure, and it will automatically restarts

it,if there is any such error.

So,in this post let's see how to fix it..

Fixing, video tdr failure requires a vast process, because most of the process requires graphic driver.

However, i herewith share some common steps that will work in windows.

Reinstall your Graphic Card driver.

Step 1 : Login to Your Windows 10 PC.

Step 2 : Press Windows + R Key simultaneously.

Step 3 : Type devmgmt.msc


[Video]


Step 4 : Hit Enter.

Step 5 : Click on Display adapters.

Step 6 : Under that you Will find display driver installed on your PC.

Step 7 : Right Click on it and Select "Update driver Software".
How to Fix Screen Flash in Windows 10


Step 8 : Connect to internet and Select "Search automatically for updated driver 

Software" option.


How to Fix Screen Flash in Windows 10


Step 9 : Restart after installation.

If it says,the driver is in already updated, then try Roll back driver option, which will be on Properties tab ( Click on Properties,instead of Update driver software while on Step 7)

Check whether Graphic card performance is set to Maximum..

Step 1 : Login to Your Windows 10 PC.

Step 2 Open Control Panel.

[See : How to Open Control Panel Easily]

Step 3 : Click on Hardware and Sound.

Step 4 : Click on Power Options on the right pane.

Step 5 : Click on Change Plan settings,on the right pane.

Step 6: Click on change advanced Power settings.

Step 7 : Scroll down and you can find your graphic card there,click on it..

How to Fix video tdr Failure error in Windows 10 [ Solved]


Step 8 : Expand it, and set it to Maximum Performance -> from balanced.

Step 9 : Click on Apply -> OK

Step 10 : Restart your PC.

Check Whether your System files were OK..


2) Type the following Command

sfc/scannow

3) Hit enter.

4) Wait,till the scan completes.

Run Compatability, as some drivers won't support the latest edition of Windows.


Defragment your hard disk...


The above ways,will fix the video tdr failure..

Hope it is helpful.

Applicable for the following errors:

video tdr failure, video tdr failure atikmpag.sys,video tdr failter atikmpag.sys windows 10, video tdr error, video tdr failure nvlddmkm.sys windows 10,video tdr failure igdkmd64.sys windows 10,video tdr failure atikmpag.sys windows 10 hp,video tdr failure windows 10 nvidia, video tdr failure fix,video tdr failure windows 10 amd.