March 2016

How to fix "Sorry,We Couldn't connect to Microsoft services right now" error in Windows 10 [Solution]

Recently,When i tried to sign in to my Microsoft account,an Error Message popped on my Screen,Stating ,"Sorry We Couldn't connect to Microsoft Services right now,if the problem still persists,Search for "network problems" on Start Screen ,even though i had an Stable Internet Connection on My PC.I tried different solutions and finally fixed the problem.

If you had faced such an problem,then here is an solution that may help you.

Below are the different methods(Sharing as Steps) i tried,give it a try it may help you too.


Method 1 : By Creating a new user Account & try again.

If you are using Windows 10 editions like pro,enterprise,etc other than Home you can use 

group policy to do a perfect job.

Step 1 : Press Windows + R,type lusrmgr.msc

Step 2 : Hit Enter.

Step 3 : Click on Users.

Step 4 : Right click on the empty area on that window,select new user.

Step 5 : Type Your User name,password,etc and click create.

Note : "If you are using Windows 10 Home edition,you can 
use setting and Control panel to create new user account,for that [Check this Article]

Step 6 :  Sign out from this account and Sign in to the newly created account and Try again,

you may find,it fixed the issue.

The Above method Worked for me,if you Still Can't Solve the problem,try the below 

methods too.

Method 2 : Using Official troubleshooter.

Step 1 : Login to your Windows 10 PC.

Step 2 : Connect your PC to internet,and visit the following official link to download .


Step 3 : Open the downloaded Program

How to fix "Sorry,We Couldn't connect to Microsoft services right now" error in Windows 10 [Solution]
Click on the image to view full size.
.

Step 4 : Click on Next.

Step 5 : When you Clicked,it will display a window,as detecting problems,Wait till it 

completes.

Step 6 : Click on next in the Window that displays.

Step 7 : Now,try again if the problem persists,try the following method.

Method 3 : Enabling Microsoft Services.

Step 1 : Login to your Windows 10 PC.

Step 2 : Press Windows logo + R key,type Services.msc

Step 3 : Hit Enter/ Select OK.

Step 4 : Find and Right Click on Microsoft Account Sign-in Assistant.

How to fix "Sorry,We Couldn't connect to Microsoft services right now" error in Windows 10 [Solution]
Click on the image to view full size


Step 5 : Select Start,if it is stopped,Also Select Properties.

Step 6 : On the Start-up type Set it to Automatic.


Step 7 : Click on Apply -> OK.

Step 8 : Close the Window,restart and try again.

That's it..

                                                "Hope it is helpful"

Don't forget to Comment if you had any doubts...
How to fix Auto hide taskbar in Windows 10

Task bar is one of the essential component of Windows.We Can launch Any apps directly 

from task bar,Change time,network and much more using this taskbar.We Can customize 

task bar to auto hide when we work with apps and enable it later.So here is an tutorial for 

auto hide task bar and Fix auto hide taskbar in Windows.

Do i need any third party Softwares ??

The answer for this is no, because there is an inbuilt option in Windows,so we don't need 

any third party apps to accomplish the task.

How to do it ??

It is an Very easy task.

Just follow the Steps below..


Step 1 : login to your Windows 10 PC.

To Auto hide taskbar :

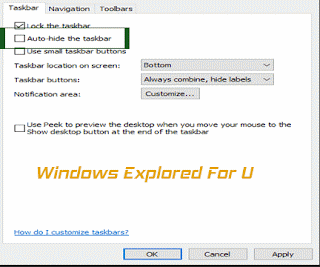
Step 2 : Right click on the taskbar

Step 3 :Select Properties.

Step 4 :Check Auto-Hide the taskbar option.


How to fix Auto hide taskbar in Windows 10
Click on the image to view full size


Step 5 :Click on Apply.

Step 6 :Click on OK.

Step 7 :Close the Window.

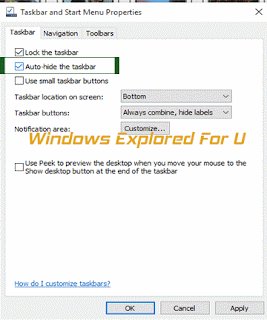
To Fix Auto hiding taskbar :

Follow Steps 1,2,3.

Step 8 : Uncheck Auto-Hide the taskbar option.


How to fix Auto hide taskbar in Windows 10
Click on the image to view full size


Step 9 : Follow Steps 5,6 & 7.

[Also See : How to Make Windows to not Save recently Opened items in Windows 10]

That's it...


How to create shortcut for Wi-Fi Settings in Windows 10

WiFi is an awesome technology discovered in this Modern world,All laptops,PC's and 

Smartphones have an option to go for an WiFi.Windows 10 too has the setting for 

Customizing WiFi settings.So here is an article Which explains the concept of creating 

Shortcut for WiFi settings. 

How to do it ???

Just Follow the Following Steps in Your Windows 10 PC.

Step 1 : Logon to Your Windows PC.

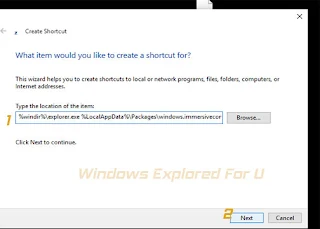
Step 2 : Right click on Any empty area of desktop and Select new->Shortcut.


Type the following in the Box

How to create shortcut for Wi-Fi Settings in Windows 10
click on the image to view full size


%windir%\explorer.exe %LocalAppData%\Packages\windows.immersivecontrolpanel_cw5n1h2txyewy\LocalState\Indexed\Settings\en-US\AAA_SettingsPageNetworkWiFi.settingcontent-ms

 and Click on Next.


Note : If Your language is not US English then Change en-US According to your Language,Example en-GB for United Kingdom,etc... 

Step 3 : Name the Shortcut as,anything You want to be the name,Example : WiFi.


Step 4 : Click on Finish.

Step 5 : Close the Window.

Now Again Right Click on the Created shortcut And Select Properties for changing the icon 

for the created shortcut.check the below article for complete steps.

[Click to See : How to Change Icon for Any App/Shortcut in Windows 10]

That's it...


                                   "Hope it is Useful"


How to download custom theme for Windows 10

Themes provide best look to our PC,Windows 10 Comes with  many preinstalled themes is 

well known.If you don't like the themes they provide (or) if you wish to save your favorite 

theme,then here is an tutorial which describes how to download and install the theme in 

your PC.

What is a theme ??

Themes are nothing but the collection of Pictures,sounds and others like Screensaver and 

its related areas.

Here's how to download and install..


Step 1 : Login to Your Windows 10 PC.

Step 2 : Open Control Panel.

[See : How to Open Control Panel easily!]

Step 3 : Click on Change theme under Appearance and Personalization,

Step 4 : It Will open a new Window,under Mythemes,Click on Get More themes Online.


How to download theme for Windows 10
click on the image to view full size


"Get More themes Online " Will be Available as last option on the right pane under My 

theme.

Step 5 : When You clicked,it will open Windows theme download page on your default 

browser.


How to download theme for Windows 10
click on the image to view full size


[See : How to change default browser in Windows 10]

Step 6 : Find the theme you wish to save on your pc and click on download.

Step 7 : After downloading,click on the downloaded file to open.

When you open the file,your theme will be Changed immediately.

That's it...


                                         "Hope it is helpful"

How to activate and deactivate slide to shutdown feature in Windows 10


We Can Shut down our Windows 10 PC in many Ways,like using alt+f4,start,run,etc here is 

an another way to shut down our Windows 10 PC especially useful in touch enabled 

PC's.All we need to  perform is  a simple slide.

How to do it ?? 

Enabling Slide to Shutdown is an easy process,just follow the Upcoming steps.

Step 1 : login to Your Windows 10 PC.

Step 2 : Press Windows logo + R Key.

Step 3 : It Will Pop up run command,on that type

Slidetoshutdown

Step 4 : Hit enter

That's it,now pull down the screen to perform Shudown.

How to disable it ??

By default,When you restart your PC,slide to shutdown option is turned off,if your PC still 

displays the message,you can disable it...

For that do as follows.


  • Open control panel.

[See : How to Open Control Panel Easily]


  • Click Troubleshooting.

Click on the image to view full size


  • Select improve power usage.


  • Select next on the window that follows.


  • Close and restart your PC.


That's it...

How to add Custom Message to Windows 10 login screen


A Simple message can be useful in many ways,and particularly when we set a message 

like please return to this address (some address) if you found this PC and you will be 

rewarded for your act,etc... message in your login screen.this may be helpful when some 

one find our lost Windows 10 PC/tablet or laptops which contains some sensitive 

information.So,here is an tutorial Which will make Windows to display custom message in 

login screen.

How to do it ??

It requires editing a Simple registry key,

Just follow the steps below..

Step 1 : Login to your windows 10 PC.

Step 2 : Press Windows (logo) + R Key,and type regedit.

Step 3 : Hit enter.

Step 4 : Navigate to the following...

HKEY_LOCAL_MACHINE->SOFTWARE->Microsoft->Windows->CurrentVersion->policies

and then to System.

Step 5 : On the right pane,Click on LegalnoticeCaption.

Step 6 : On the Value date field,type the heading of the message like please read or Caution,etc..

Step 7 : Click OK.

Step 8 : Next,on the Same right pane,Click on Legalnoticetext

Step 9 : Same as above,type the Message you want to display like your Contact details or 

something you wish like please return in a day or else your identity will be sent to the owner 

and local police station,etc.


How to add Custom Message to Windows 10 login screen
Click on the image to view full size


Step 10 : Click on OK.

Step  11 : Close the Window.

Now,restart your PC you Will find the Message you created on the login screen.

That's it...

                                          "Hope it is useful"


20 things you need to do to protect your Privacy in Windows 10

Privacy is the most feared thing every Windows 10 User care about,this is because from 

the initial release of windows 10 preview,there are lot of talks about privacy because 

Windows 10 is programmed to Send anomoyous information to Microsoft,People forget to 

think this is normal as every software developer wishes to know about how their software is 

used,and it begins to work while the program installs.Windows 10 too like other software 

collects this information for serving you better,and the information is not like collecting about 

your credit card details or something more serious then it,it collects the information,only 

about how apps behave on your PC,&if it has some problem,then the data is sent to 

Microsoft for analysis,and if a threat is found it will send the fix for you through Windows 

update for serving you better,and preventing it from infecting other PC's.If you still think it 

affects your privacy you can control all the information sent to Microsoft.

Let's see how it can be done...

Just follow the Steps below..


Step 1 : Login to Your Windows 10 PC.

Step 2 : Open settings.

[Click to see : Easy way to open Settings.]

(or)

Press Windows + I key

Step 3 : Click on Privac,on the new window that opens.

Step 4 :  In general field,turn all options off,except turn on smart screen filter to check Web 

content (urls) that Windows store apps use..turning on this option will make your PC to 

check for viruses in a app that we are going to install via Windows store.


20 things you need to do to protect your Privacy in Windows 10
Click on the image to view full size


Location  : Turn off all options.

Camera :  Turn off the option,let apps use my camera.

Microphone : Turn off the option,let apps use my microphone.

Speech,inking &typing : Click stop getting to know me.

Account info : Turn off lets app use my name,picture and other info.

Contacts :turn off all apps under choose apps that can access contacts..

Calendar,messaging,radio ->Off.

Other devices  : Turn the option off under Sync With devices,if you don't wish to sync between your devices.

Feedback & diagonisitics :  Click and Check this article...

Background Apps : Turn all of them off.

Now press Windows (logo) key and type Windows defender settings->Select the top most result.

It Will open Windows defender settings on that,

Turn off all options except the one under real time protection.

Now again press the Windows key and type Change WiFi settings->Select the top most result.

Click Manage Wifi settings on the right pane.

Uncheck all options under WiFi sense.

Close all Windows..

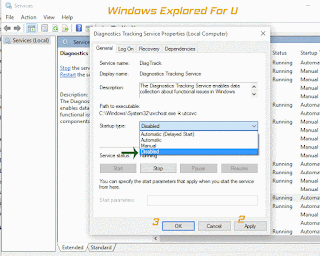
Now press Windows (logo) + R key,type services.msc and hit enter.

Scroll down and Find the services

 1)Windows Error Reporting service.

2)Connected User Experiences and Telemetry

3)Diagnostic Tracking Service

Right click on the above services,select Properties ->@ startup type,change the option's 

and Set all them to disabled,by selecting disabled ->Apply->Ok.


20 things you need to do to protect your Privacy in Windows 10
Click on the image to view full size


Now,close all the Windows.

Restart Your PC.

That's it guys,now your privacy is protected and no more information will be sent to 

Microsoft again..

Did i Missed anything ?? Share and notify us as comments..


How to view stored Wifi passwords in Windows 10

WiFi is the fastest emerging network,wherever we go,atleast a WiFi network will be 

available whether it is secured or left open,we can see its name.Sometimes we may forget 

that password,we can see it is connected,but we may had forgetten the password.So,here 

is an tutorial which deals with finding the stored wifi passwords in Windows 10.

How to view it ??

There are many ways to retain /find the stored WiFi password,the following are the most 

easiest ways...

Just follow the upcoming steps...


Method 1 :

Step 1 : Login to your Windows 10 PC.

Step 2 : On the taskbar,find the WiFi icon,right click on it.

Step 3 : It Will display two options,Such as 

i)Trouble shoot problems and 

ii)Open network and sharing center,

Click on the Second Option.

Step 4 : It Will open a new Window,in the control panel,Click the network that is Connected.


How to view stored Wifi passwords in Windows 10
Click on the image to view full size


Step 5 : It will pop a new Window,select Wireless properties->security.

Step 6 : Click Show Characters.

That's it...

Method 2 : 

Follow Step 1.

Step 7 : Open Cmd 

[Click to see : How to open cmd in Windows 10 Easily]

(or)

Press Windows + X ->Select Command Prompt.

Step 8 :Type the following command and hit enter

netsh wlan show profiles

Step 9 : Hit enter.

Step 10 : When you hit enter,it will open list of WiFi profiles available on your system,

Step 11 : If you wish to view password for the particular profile,

type the following command, and profile name which you need to "retrieve the password" 

which is shown on cmd.

netsh wlan show profile name="your proflle name" key=clear


How to view stored Wifi passwords in Windows 10
Click on the image to view full size


Note :In the above step,type your profile name in between quote marks(" ")

Step 12 : Hit enter..

That's it,your password will be shown...


                                    "Hope it is Useful "

Does it Worked ? Share your Views as comments....


How to Change language in Windows 10

We can only use our PC if the language is known to us.if Some other language which we 

never learnt runs on your system,then,we can't use Our PC as normal,So here is an tutorial 

describing how to Set our language in Windows 10 PC,

How to change it ??

Windows language works,based on our location,so if we need to change the language we 

need to change the location first,and then followed by downloading language pack.

Just follow the Steps below...


Step 1 : Login to your Windows 10 PC.

Step 2 : Press Windows(logo) Key on your keyboard,and type Region & language 

settings,Select the top most option,which will open a new window as Time & language on 

settings.

Step 3 : Select Your Country under country or language

Example :India 

Step 4 : Click on Add a language under languages Option.

Step 5 : When You select it will Open list of languages,Windows OS can run available.


How to Change language in Windows 10
Click on the image to view full size


Step 6 : Find and Select the language you need,example : Tamil

Step 7 : When You Select,it will get you back to the previous window,displaying a message 

searching for Windows update,connect your computer to Internet,for downloading the 

language pack.


How to Change language in Windows 10
Click on the image to view full size


Step 8 : After downloading,click on the language and select,Set as default.

Step 9 : Now,again press Windows key and type language.

Step 10 : Select the language,that was installed earlier.


Step 11 : You Will be prompt a new window,select log off..

That's it,now the new language will be set as your default language..

Got a tip ?? ,you can Share it as comments...