February 2016

Some Pages that you Should notice

How to fix "Yes" Option grayed out in UAC Error in Windows 10

Our PC is Capable of producing Strange errors Sometimes,One of the error which 

frustrates us is "Yes" Option grayed out in User Account Control,This happens even we 

are Already logged as Admin.So here is an tutorial for fixing it.

How to fix it ??

We Can fix this,by booting into safe mode of our PC and enabling the Super Admin 

Account,or changing our account type,just follow the following Steps in Your Windows 10 PC.

Watch the following Video.. (Or) the Steps...


Step 1 : Get into Advanced Start up options if You had Already logged into Windows.

(or) Lock Your Computer by pressing Windows + L key Which Will displays login screen 

instantly.

Step 2 : On the Login Screen hold Shift key and Press Restart.

Step 3 : It Will boot to Advanced Start-up options.

Step 4 : On that Navigate to troubleshoot->Advanced Options.

Step 5 : Select Startup Settings..

Step 6 : Select restart.

Step 7 : .Press 4 to enter into Safe mode.

Step 8:  login to your Account where UAC is greyed out,

Step 9 : Press Windows + R Key,type Control,hit enter (or) Go to Control Panel.

Step 10 : Click on User Accounts->Change Account type-> Select Administrator,Click Again 

Change Account type to save Changes.

Step 11 :Restart your PC,and login again to the Same Account,now you Will See the 

problem is fixed.


                                       "Hope it is Helpful"

How to Clean boot Windows 10

Hello friend,Welcome to Our blog,in this tutorial lets See how to Clean boot Windows 10.

What is Clean boot ??

If Your PC is Causing Some issues due to install of Some Softwares or if it is not running 

Well,We Can identify the problem and Solve it using the Clean boot method.i.e., If We need 

to determine Whether the install of that particular Software is Causing issues,(or) is 

Windows itself is Causing issues,then performing Clean boot is the best option.

What Will happen When You Clean Boot??

Performing Clean boot doesn't leads to lose of our Work,Performing Clean boot will make 

our PC to load only Windows services (without loading the other items) during Start-up.

How to Clean boot??

Performing Clean boot is an easy Process,All you need to do is just follow the upcoming 

steps in Your Windows 10 PC.


Step 1 : Login to Your Windows 10 PC.

Step 2 : Press Windows + R Key Simultaneously.

Step 3 : It Will display run command,on that type the following

"msconfig"(Without quotes")

Step 4 : It Will open a new Window named as System Information,on that do as follows

Step 5 : Click on Selective Startup items.

Step 6 : Uncheck load Startup items.

How to Clean boot Windows 10


Step 7 : Click On "Services" tab.

Step 8 : Check "Hide Microsoft Services".

Step 9 : Select disable all.

How to Clean boot Windows 10


Step 10 : Click On Apply.

Step 11 :Click On OK.

Step 12 :Close the Window.

The next time when you boot you can see the changes.

That's it...


How to uninstall driver in windows 10

Drivers are the one which causes Our PC to work Perfect,A PC With perfect driver will work 

perfectly. But Some times,that drivers too cause Problems in Our PC.The issue may be due 

to installed outdated device driver or the driver that has some errors or Whatever it may 

be.it Will Cause Errors in Our PC.And Particularly in Windows 10 Where Our Windows 

update is set to automatic Will download the driver Without Checking of errors.

So,you need to Uninstall that driver to make your PC stable again.So here is an tutorial for 

explaining how to uninstall driver in Windows 10.

How to Uninstall ??

Just follow the Steps below.

Step 1 : login to your Windows 10 PC.

Step 2 : Press Windows + R Keys Simultaneously.

Step 3 : It Will display Run Command,on that type the following command.

"devmgmt.msc" (Without Quotes)

Step 4 : Hit Enter,Or press OK.

Step 5 : It Will open a new Window which is known as device manager,on that do as 

follows.

Step 6 : Find the driver that is Causing issues.

(For example : If the issue was caused by display driver,click under display,Similarly if it 

was due to driver installed due to windows update, Visit the windows update option and find 

the driver in list of updates.)

Step 7 : Select the driver.

Step 8 : Right Click on it and Select uninstall.

How to uninstall driver in windows 10


Step 9 : It Will prompt Warning Message Stating about that You Are going to uninstall that 

driver,ignore it and Select Ok,and Follow the Next Steps which depends on the driver.

Step 10 : Wait till the uninstall Completes.After completion,Close the Window. 

Note : Some drivers needs your PC to be restarted for Complete uninstall,on Such 

Cases,Save Your Unsaved  Work and Select restart.

That's it...

Warning : If the driver was installed through Windows Update,Your PC Will try to 

reinstall the Same update again,you need to temporarily stop the update from 

reinstalling[Check thisfor Steps.

Other Articles:

7 Ways to Run Cmd as Admin in Windows 10

How to Access CMd at boot ???

[Click to See all Windows 10 Articles]

How to temporarily prevent driver update from reinstalling in Windows 10

Drivers play the key role in Our PC.What if the downloading of updated driver Cause the 

PC unstable ? Simple you need to uninstall the driver that downloaded.Since there is no 

official way to stop windows from Updating Automatically[other than this], You can't Stop 

Windows from downloading the Same update in Your PC which was done by Windows 

Update right ? Don't worry here is an tutorial for Making Windows update temporarily stop 

that particular driver update. 


How to temporarily prevent driver update from reinstalling in Windows 10


What is a driver software ??

Driver software's are the one Which helps to run the hardware as per designed,i.e for 

example : Your Speaker is just a device,they are programmed to work as per the job,that 

program is known as driver.Enough Said! let's See how to stop.

How to temporarily Stop Windows Update??

If You Wish to Stop Windows 10 Update temporarily,i.e until the next release of that 

particular software,just follow the Simple steps below.

Step 1 : Sign-in to Your Windows 10 PC.

Step 2 : Visit this link [official Link,Official link 2(If the previous link doesn't work or 

changed Select download on the page.] 

There is an official software known as wushowhide.diagcab Which helps to Stop that update.

Step 3 : When You Clicked,the program will Start downloading.

Step 4 : After downloading,double click and run.

Step 5 : The program will Work,same as troubleshooter,Click on next.

Step 6 : Wait until it searches.

Step 7 : It Will display,two options such as "Hide Updates" and "Show hidden updates",Click on 

Hide Updates option.

Step 8 : It Will Again Search and will display the drivers,Check the driver that Caused some error by 

Windows update (Example : Realtek in the below Pic)


How to temporarily prevent driver update from reinstalling in Windows 10
[Click on the image to view full size]


Step 9 : Click on it and Select next.

Step 10 When you click it will display a window as resolving issues,wait until resolves and After 

Completion Close the window.

Note : When You Came to know that the latest version of that driver with bugs fixed was 

released,And if you Wish to install,Simply run the program again,and Select Show Hidden updates 

Option,select the update that was hidden earlier and Click next.

That's it..

Don't forget to let us know if you face any difficulties...

Note : If You wish to Make Windows 10 to never download drivers through Windows update [Check 

this]

Other Articles :

How to Disable Cortana Permanently in Windows 10 [Tutorial]

How to Run Cmd as Administrator in windows 10 [Tutorial]

And More...


How to fix ProfSvc and User Profile Service Failed Error in Windows 10

Today when i booted by PC it boots into login screen as usual,but after sometime it suddenly starts to freeze,i can't do anything like entering password.i thought its because of some loading problems so i decided to wait for some time for windows to load and but what it done was nothing but displaying an error as ProfSvc failed or more Commonly User Profile Service failed,i decided to run sfc scan( but that's not possible because i need to login to my user account to do that right ??) 

Since i clearly identified the problem is due to the user account what immediately stroke on my mind was one idea which is using an alternative user account.

But i had an additional problem waiting there was i had only one user account on my PC which directed me to look for other options.Finally i had fixed the problem by myself and i'm sharing here what i had done to fix the error. If you had faced with same issue then here is an solution that might fix the issue.


What is the cause of the error ??

The main reason for the error is corrupted user profile,when Our user profile gets 

Corrupted,all our Password and its Components Will never work in proper way,which will 

results in difficulty in Signing-in to windows.

How to fix it ???

Since,our primary aim is getting in to Our PC,we need to enable the hidden Administrator 

account (Also Known as Super administrator).Once we enabled this Account We are 

capable of signing-in to Windows after that we need to create another user account.

Enough Said,lets see how to do that.

Just follow the Steps below.

Step 1 : When You Are at login Screen,Click on Power logo.

Step 2 : Hold Shift Key and Press restart.

Step 3 : It Will make your PC to boot into another mode(where we can troubleshoot/repair 

our pc,if we have any problems),on that do as follows.

Click on Troubleshoot and then Select Advanced options

Step 4 : You Will find Command Prompt,Select it.


How to fix ProfSvc Error in Windows 10


Step 5 : On the Command Prompt,type the following Command.

net user Administrator /active:yes 

(Note : leave one Space after Administrator.)

Step 6 : Hit Enter.

Step 7 : After you received a message Stating that "The Command Completed Succesfully" 

Restart your PC,You Will find Accounts that Corrupted and a new Account with no password  
sign-in to the new Account .

8) Now create a new user account,to use your problem as normal...


Note :Using Super Admin Account as your default User Account is not advised,as we 

need to reuse when we again face the same/different problem,So create new user Account.

For steps to create user account [Click this...]

9) After Creating Navigate to (your Windows installed location mostly C drive) C:\Users -> 

Select your old Account->Copy files that are needed like documents,downloads,etc.. and 

Save it another location(like on different drive).

10 ) If it contains any important things like game caches stored in documents simply Copy 

the files you saved on using step 9 now to Your New Account Copy/replace those files...  .

Update 1 : Many Users said, the above method is not working, if you face with the above error, then here is another way you can recover it too..

11) Boot your Windows Installation CD/DVD Drive or ISO file

12) When your setup loads, Press Shift and F10 Keys of your keyboard.

13) It will display Command Prompt, on that type

move C:\windows\system32\utilman.exe d:\windows\system32\utilman.exe.bak


copy C:\windows\system32\cmd.exe d:\windows\system32\utilman.exe  and hit enter

14) Now close the window, remove the Installation media and start your PC as usual.


15) When you are on the login screen, there will be a ease of case button ( the one that you can use to load narrator, magnifier,etc) click on it.

16) It will now display Command Prompt because of the commands we typed on the step 13 instead of ease of access.

17) Now type the net user commands you seen on step 5.

and follow the remaining steps. .

That's it....

Enjoy..

How to Fix Windows 10 Update issues

In this tutorial let's See how to fix Windows 10 Update issues.

What is Windows update??

As the Name Says about it,Windows Update is used to update Windows.Sometimes,When 

We Update Windows,Our PC fails to update and Will display Some error codes  starting As 

0x..and ending with Some values,and Ask us to try again later.

How to fix it ?
We need to run the trouble shooter to fix the problems.Just follow the Upcoming steps to fix 

the issue.

Step 1 : Login to Your WIndows 10 PC.

Step 2 : Open Control Panel.

[See : How to Open Control Panel easily!]

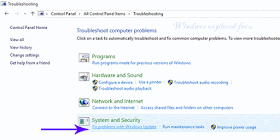
Step 3 : Click On Find and Fix Problems under System and Security.

Step 4 : Select Fix Problems With Windows Update  on the right pane.


How to Fix Windows 10 Update issues


Step 5 : Click on Advanced and Select Run as Administrator.

Step 6 : Click on Next,on the next Window that follows

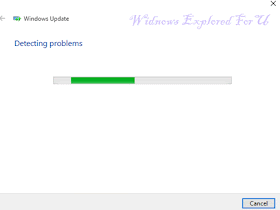
Step 7 : It Will display a Window Stating that Detecting Problems,Wait till it completes.

How to Fix Windows 10 Update issues


Step 8 : It Will Fix the issues that prevent Windows from updating.

Step 9 : After it finishes Close the Window.

Method 2 : 

Step 1 : Login to your Windows 10 PC.

Step 2 : When You are at desktop,Press Windows + Q key.

Step 3 : Type Troubleshooting.

Step 4 : Select Fix Problems With Windows Update  on the right pane.

Step 5 : Click on Advanced and Select Run as Administrator.

Step 6 : Click on Next,on the next Window that follows

Step 7 : It Will display a Window Stating that Detecting Problems,Wait till it completes.

Step 8 : It Will Fix the issues that prevent Windows from updating.

Step 9 : After it finishes Close the Window.


Disable Cortana Permanently in Windows 10 [Tutorial]

Hi Friend,Welcome to Our blog.In this tutorial let's see how to disable Cortana Permanently.

What is Cortana ??

Cortana is an App that Can give you suggestions,and other things by tracking your Activity 

in Your PC.Though it is an Very Useful feature introduced in Windows 10,Some of our 

Users dislike due to the privacy issue.On our Earlier tutorial we seen how to turn off and 

turn on cortana.If You like to disable Cortana Permanently,then here is an tutorial regarding 

that.

How to disable it ??

Cortana Can be disabled using Group policy Editior, and it is not an big task.

Just follow the Upcoming Steps in Your Windows 10 PC.

Step 1 : Login to Your Windows 10 PC.

Step 2 : Press Windows + R Keys Simultaneously and type Gpedit.msc

Step 3 : Hit Enter.

Step 4 : It Will Open a new Window,which is Local Policy Editior,On that Navigate as 

follows.

Click on Computer Configuration->Administrative Templates->All Settings.

Step 5 : Find Allow Cortana Option.


Disable Cortana Permanently in Windows 10 [Tutorial]
Click on the image to view full size


Step 6 : Click on it.

Step 7 : When you Clicked,it Will open a new Window with Not Configured Option Chosen.

Step 8 : On that,Select disabled.


Disable Cortana Permanently in Windows 10 [Tutorial]


Step 9 : Click on Apply.

Step 10 : Click on OK.

Step 11: Close the Window.

Note : When you Clicked Apply,Only Your Cortana and its Components are disabled,You 

Can Still make a Search in Search bar and other areas only as we do in older Windows 

versions like Windows 8 and 7.

If You Wish to Enable Cortana,then refollow the above Steps and Select Not configured 

Option While in Step 8 and follow other remaining steps.   

That's it...

Repair corrupted Windows 10 files [How to guide]

Repair corrupted Windows 10 system files, that's what we're going to see in this post. Hi,Welcome to Our blog.In this tutorial lets see how to repair corrupted System files in Windows 10.

What is a corrupted file basically ?
Basically, a corrupted file is nothing but the file that was changed due to any activity or something, For example : Let's take it this way. If your Windows System32 folder has some important file, and if you had deleted the file, then the process that depends on the file won't be able to work, and another one that depends on the previous one won't work, it goes on making the system unstable. i guess explaining things technically would be difficult for the beginner so i will stop it here, and will suggest a fix..

How to do it ??

We Can fix any issues with our System like blue screen,application errors and much more 
that are Caused due to Corrupted System files using sfc command.All You need to do is 
follow the steps below.

Repair Corrupted Windows 10 System files [ How to guide]


Step 1 : Login to your Windows 10 PC.

Step 2 : Run Cmd As Admin.

[Click to see : How to run CMD as Administrator easily in Windows 10]

Step 3 : Type sfc/scannow

sfc/scannow Command Will Scan all Protected System files and replaces the Corrupted 

files using the files that Was located on (Windows installed 

directory)\Windows\System32\dllcache( A Compressed folder)


Repair Corrupted System files in Windows 10


Step 4 : Hit Enter.

Step 5 : Wait for few minutes (or) until the Scan finishes.

It Will Fix Any Corrupted System files in Your PC.

Note :

1.If the PC displays "Windows Resource Protection doesn't find any integery 

violations"then there is no corrupted System files in Your PC. 

2.If the PC displays "Windows Resource Protection could not perform the request operation"

or Similar error,it indicates that there is error in starting the sfc command.

to fix type the following command in CMD.

DISM (Space)/Online (Space) /Cleanup-Image (Space) /RestoreHealth

(leave one space as denoted above before typing / symbol which will be followed by 

commands refer below pic.)


Repair Corrupted System files in Windows 10


Which Will Also result in Waiting for Sometime,Wait for few minutes even though the 

Process Stops for longer on Same percent like 20.

3.Restart Your PC after it finished and try sfc command again.

That's it.

Hope it is helpful.