Windows 10 and Windows 11 have introduced numerous options for customizing the appearance of your desktop and application windows, allowing for personalized aesthetics that can make using a computer a more enjoyable experience. This article aims to demystify the process of changing your window color and appearance by providing step-by-step guidance, tips, and tricks specifically for novice! Furthermore, i will utilize practical shortcuts that allow users like you to manage their display settings more efficiently. Enough said! Let's dive in!
First, let's Understand Windows Color and Appearance
Windows operating systems offer various visual customization options allowing users to change the colors of their windows, text, and backgrounds. This can enhance visibility, make everything more aesthetically pleased, and even help users feel more connected with their devices.
What are Window Colors?
Window colors refer to the hues and shades that are used for the various elements in Windows' interface, such as the taskbar, borders of open applications, and background colors. By adjusting these settings, you can create a workspace that better suits your tastes and improves usability.
2. How to Access the Color Settings Menu
Accessing the color settings menu in Windows is remarkably straightforward, even for beginners. Here’s how to do it in both Windows 10 and Windows 11:
Windows 10:
Click on the Start Button: The Start button is located in the bottom-left corner of your screen.
Select Settings: This option looks like a gear icon.
Go to Personalization: Click on "Personalization," and you will see various options for customizing your device.
Choose Colors: On the left panel, select "Colors."
Windows 11:
Click on the Start Button: Located in the center of the taskbar.
Select Settings: This also appears as a gear icon.
Go to Personalization: In the left panel, click on "Personalization."
Choose Colors: Click on the "Colors" option.
In both versions, you'll find numerous settings available to customize colors according to your preferences.
3. Shortcut Keys for Quick Access
Using shortcut keys can significantly enhance your experience and make navigation smoother. Below are some useful shortcuts for quickly accessing color settings in Windows:
- Windows Key + I: Opens the Settings menu directly.
- Windows Key + D: Minimizes and restores all windows, allowing for quick visibility of the desktop background.
Alternative Shortcut Method:
You can create your own shortcuts using the following method:
- Right-click on the desktop and select New > Shortcut.
- Enter the command:
explorer shell:colors - Click "Next," name your shortcut (e.g., Change Colors), and click "Finish."
This shortcut will provide direct access to the color settings with just one click.
4. Customizing Color and Appearance
Changing Colors:
Once in the Colors settings, you can modify various aspects:
- Choose your color: Select from Light, Dark, or Custom themes.
- Accent color: Pick a color that will highlight active elements like buttons and toggles.
- Transparency effects: Toggle this option on or off to create clear or frosted window overlays.
Adding Personal Touches:
- Go to Start > Settings > Personalization > Themes.
- Here you can choose between preset themes or create your own by adjusting colors, sounds, and desktop backgrounds.
5. Understanding Themes in Windows
Themes are predefined combinations of wallpapers, colors, sounds, and mouse pointers that create a cohesive visual style across your operating system.
Changing Themes:
- Settings > Personalization > Themes.
- Choose from existing themes or create a new one by modifying a pre-existing theme.
6. Changing Backgrounds and Effects
A personal desktop background can change your screen's overall ambiance:
- Right-click on the desktop: Select "Personalize."
- Click "Background" to choose a picture or solid color.
- Select your desired layout (Fit, Fill, Stretch, etc.).
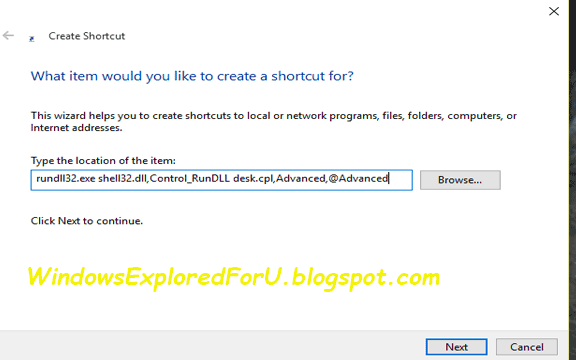
How to Create Shortcut if you are on oldest version of Windows 10???
We Can Create Shortcut for Any Kind of Apps like We Created for Battery Saver,Advanced Startup Options,etc..So you can also Create Shortcut for Color and Appearance the same way!
Step 1 : Login to your Windows 10 PC.
Step 2 : Right Click on the Empty area of desktop.
Step 3 : Select New-> Shortcut.
Step 4 : Type the following inside the box,on the Window that Opens.
rundll32.exe shell32.dll,Control_RunDLL desk.cpl,Advanced,@Advanced
Step 5 : Click on Next.
Step 6 : Type the Name,According to Your Wish,Example: Color.
Step 7 : Click on Finish.
Note : If You Wish you can Change icon for that Shortcut.to Change Shortcut icon[Check this!]
That's it...
Now You Can Access Color and Appearance Setting directly from your desktop.
7. Some tips:
- Keep it Simple: Opt for fewer icons on the desktop to minimize confusion.
- Increase Font Size: Go to Settings > Ease of Access > Display to make text larger.
- Regular Practice: Familiarize yourself with the color settings by visiting them regularly.
- Utility Apps: Consider downloading applications that enable better visibility and user customization.
Alright, we are at end of the post.
Understanding and customizing the window color and appearance in Windows 10 and Windows 11 can significantly enhance your user experience. I hope it helped you!

