September 2015

Some Pages that you Should notice

Complete Guide to Clear File History in Windows 10 and Windows 11[Updated]

Are you unsure about how to clear file history on your Windows 10 or Windows 11 computer? This guide is designed for beginners, especially seniors, offering step-by-step instructions to help you manage your file history effortlessly. Understand the importance of clearing file history, not just for privacy concerns but also to improve your system’s performance and free up valuable storage space. You'll learn how to navigate settings, apply various methods to remove specific files or clear all history, and even use tools like Disk Cleanup. With easy-to-follow instructions and helpful FAQs, this guide ensures you can confidently take control of your computer's file management. With a clearer understanding of how to maintain your device, you can enjoy improved performance and peace of mind. Whether you're a complete novice or someone looking to enhance their tech skills, this guide will make the process straightforward and effective.


Files! Files where you see its there! Managing files effectively is crucial, especially in today’s digital age you know what i mean, where computers play a vital role in our daily lives. One such essential task is managing file history—specifically, how to clear file history in Windows 10 and Windows 11. For those who may not be tech-savvy, such as seniors or individuals just starting with computers, understanding how to do this can seem daunting. This detailed guide will provide you with easy-to-follow instructions, helpful tips, and the knowledge you need to maintain your computer’s performance and privacy.


Table of Contents

  1. Understanding File History
    • 1.1 What Is File History?
    • 1.2 Importance of Clearing File History
  2. Preparing to Clear File History
    • 2.1 Checking Your File History Settings
    • 2.2 Understanding Temporary Files and Data
  3. How to Clear File History in Windows 10
    • 3.1 Accessing File History Settings
    • 3.2 Clearing Specific File History
    • 3.3 Completely Clearing File History
  4. How to Clear File History in Windows 11
    • 4.1 Navigating to File History Settings
    • 4.2 Removing Specific Entries
    • 4.3 Fully Clearing File History
  5. Using Disk Cleanup to Clear File History
    • 5.1 What Is Disk Cleanup?
    • 5.2 Running Disk Cleanup in Windows 10 and 11
  6. Advanced Techniques for Clearing File History
    • 6.1 Using Command Prompt
    • 6.2 Using Third-Party Software
  7. FAQs About Clearing File History
  8. Conclusion

1. Understanding File History

1.1 What Is File History?

File History is a built-in Windows feature that automatically backs up your files and folders, allowing you to restore them later if needed. This feature saves copies of your files every hour and maintains a version history, which means you can recover older versions of files if they are modified or deleted.

1.2 Importance of Clearing File History

While File History is an excellent tool for backup, it can also store sensitive information. Clearing your file history helps:

  • Improve Privacy: Removes access to documents you may not want others to see.
  • Free Up Space: Reduces the amount of data stored on your drive.
  • Maintain System Performance: Regular maintenance keeps your computer running smoothly.

2. Preparing to Clear File History

2.1 Checking Your File History Settings

Before you clear your file history, it's essential to know whether the feature is enabled:

  1. Press the Windows key on your keyboard.
  2. Type "File History" and select "Restore your files with File History."
  3. Check to see if it says "File History is on." If it is, you can proceed to clear it.

2.2 Understanding Temporary Files and Data

File history may use temporary storage that accumulates over time. Knowing how to clear this temporary data can help you manage your computer better. These files can be hidden or readily visible in various system folders, and it's beneficial to know where to find them.


3. How to Clear File History in Windows 10

3.1 Accessing File History Settings

To begin clearing your file history in Windows 10:

  1. Click on the Start Menu.
  2. Select Settings.
  3. Go to Update & Security.
  4. Click on Backup, then select More options.

3.2 Clearing Specific File History

If you want to clear specific files from your history:

  1. In the File History settings, look for the "Restore files from a current backup" option.
  2. Browse through your saved files and right-click on the file you wish to delete.
  3. Choose Delete to remove that specific file history.

3.3 Completely Clearing File History

To clear all file history:

  1. Still within Backup options, scroll down and click on Stop using backup.
  2. This action will turn off File History entirely, clearing the stored backups. If you wish to keep File History, go to Advanced settings to manage the stored versions manually.

4. How to Clear File History in Windows 11

4.1 Navigating to File History Settings

Clearing file history in Windows 11 is similar to Windows 10:

  1. Right-click the Start button and select Settings.
  2. Click on System.
  3. Locate and click on Storage, then scroll for Advanced storage settings.

4.2 Removing Specific Entries

To clear specific entries in Windows 11:

  1. Under System, go to Backup options.
  2. Find Restore files or similarly labeled dropdown.
  3. Select the files you don’t want to keep and click Delete.

4.3 Fully Clearing File History

To erase all file history in Windows 11:

  1. Go into the Backup settings.
  2. Click on Stop using backup to delete everything associated with the file history.

5. Using Disk Cleanup to Clear File History

5.1 What Is Disk Cleanup?

Disk Cleanup is a built-in tool in Windows that helps free up space on your computer by removing unnecessary files, including temporary files, system files, and file history items.

5.2 Running Disk Cleanup in Windows 10 and 11

  1. Press Windows + R to open the Run dialog.
  2. Type "cleanmgr" and press Enter.
  3. Select the drive you want to clean (usually C:).
  4. On the Disk Cleanup window, check the box next to File History.
  5. Click OK and then confirm to delete the selected files.

6. Advanced Techniques for Clearing File History

6.1 Using Command Prompt

For users comfortable with advanced techniques, you can clear file history via Command Prompt:

  1. Open Command Prompt as an administrator.
  2. Type del /q /f /s %localappdata%\Microsoft\Windows\FileHistory* and hit Enter. This command deletes all the file history data stored.

6.2 Using Third-Party Software

If you prefer a more graphical interface or want to automate cleaning tasks, consider using third-party tools like CCleaner:

  1. Download and install the software from a reputable source.
  2. Open CCleaner and navigate to Cleaner.
  3. Check the box next to File History and run the cleaner to remove unwanted data.
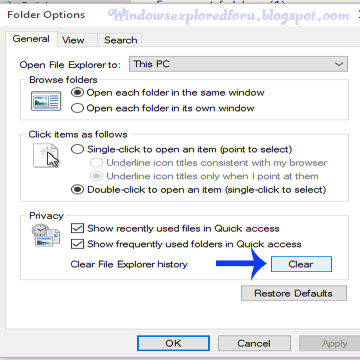
Clear file history in Windows 10

7. FAQs About Clearing File History

What does clearing file history do?

Clearing file history removes the tracked files and folders stored by Windows, ensuring that private information is not accessible.

Is clearing file history reversible?

No, once you clear your file history, the data is permanently deleted and cannot be recovered.

How often should I clear my file history?

It's advisable to clear your file history every few months, or whenever you have sensitive data you no longer want to be stored.

Can I still use File History after clearing it?

Yes, you can continue to use File History by re-enabling it after clearing the data, and it will start backing up files again.

Does clearing File History free up storage space?

Yes, clearing File History can free up some storage space, especially if you have accumulated a lot of backups.


Like i said, Managing your computer's file history is essential for privacy and performance. This guide has provided detailed steps on how to clear file history in both Windows 10 and Windows 11. From accessing settings to using advanced methods, you now have the knowledge to maintain your computer effectively. Regularly clearing your file history aids in protecting your privacy, frees up storage space, and keeps your system running efficiently. Whether you are a novice or someone looking to improve your tech skills, taking control of your file history is a significant step in mastering your computer.

By consistently managing your file history and understanding its impact, you become more adept at handling your device, leading to a more secure and efficient computing experience. Embrace your newfound knowledge, and confidently maintain your computer!

Also Read :How to install app from store in windows 10 and Windows 11 Updated Also Read :Make Windows to update Maps Automatically in Windows 10 and Windows 11 Updated Also Read :Learn how to show alarms, reminders, and calls on your Windows 10 lock screen to boost productivity and stay organized effortlessly! Also Read :Turn on or off Airplane mode in windows 10 and 11

Turn On or Off Auto Arrange in Windows 10/11: A Senior Citizen's and Beginner's Guide

Hello and welcome to our site! If you’re a senior citizen or someone who’s just starting to explore the world of Windows (not your home windows, computer Windows), this article is for you. Today, i will guide you through how to turn on or off the Auto Arrange feature in Windows 10 and Windows 11. Understanding this functionality will help you manage your desktop in a easy manner, making your computing experience more enjoyable.

2. First, let's Understand Auto Arrange in Windows

Auto Arrange is a feature in Windows that automatically organizes your desktop icons in a neat, orderly fashion. When you enable auto arrange icons, any time you add a new icon or move an existing one, Windows will position it according to a defined grid layout. This ensures that your screen remains tidy and free of clutter, which is especially helpful for those who may find managing desktop icons challenging.

3. Benefits of Using Auto Arrange

Here are some benefits of using auto arrange icons:

  • Clutter-Free Desktop: By enabling auto arrange, you get a clean workspace, making it easier to find your files and applications without the hassle.
  • Time-Saving: You won’t waste time manually aligning your icons, which is ideal for those looking for easy desktop tips for beginners.
  • Visual Appeal: A neat desktop enhances your computing environment, contributing to visual cleanliness in Windows desktops.

4. How Auto Arrange Works

Once you enable auto arrange, your desktop icons will snap into place in a systematic arrangement. For instance, if you decide to move an icon to a different location, it will automatically swap with nearby icons, adhering to a grid layout. This functionality is important for both auto arrange vs manual arrange Windows users who prefer a more governed approach to desktop organization.

5. How to Turn On Auto Arrange in Windows 10

Turning on auto arrange in Windows 10 is a straightforward process. Follow these easy steps:

  1. Right-click on the Desktop: Click anywhere on your desktop that is clear of icons.
  2. Select ‘View’ from the dropdown menu.
  3. Click on ‘Auto arrange icons’: If the option has a checkmark next to it, auto arrange is already on. If not, click it to enable the feature.

6. How to Turn Off Auto Arrange in Windows 11

Sometimes, you might want the freedom to arrange icons as you like. Here’s how you can turn off auto arrange in Windows 11:

  1. Right-click on the Desktop again.
  2. Select ‘View’ from the dropdown menu.
  3. Click on ‘Auto arrange icons’: If there is a checkmark next to this option, click it to remove the checkmark, disabling the auto arrange feature.

7. Troubleshooting Auto Arrange Issues

If you encounter issues with auto arrange, consider these troubleshooting steps:

  • Restart Your Computer: A simple restart can fix minor glitches that may arise.
  • Check for Updates: Ensure your system is up-to-date by checking for Windows updates.
  • Reset Desktop Icons: If your icons are misbehaving, right-click the desktop, go to 'View', and choose 'Refresh' to reset their positions.
How to do it if i'm using oldest version of Windows???

Turning on or off Auto Arrange Icons is an Very easy Process and incase same, even if you are using oldest version of Windows 10.

Step 1 : Login to Your Windows 10 PC.

Step 2 : Select the Location Where You need to Paste,Example:desktop.

To Turn on :

  • Right Click on empty Area of the desktop.
  • Click on View.
  • Check Auto Arrange Icons & Align icons to grid by Clicking on it.
Turn on or Off Auto Arrange in Windows 10


To Turn off :

If You Wish to turn off this Setting then don't Worry, Simply

  • Right Click on empty Area of the desktop.
  • Click on View.
  • Uncheck Auto Arrange Icons & Align icons to grid by Clicking on it.

8. Frequently Asked Questions (FAQs)

Q1: What happens if I turn off Auto Arrange?

A1: If you turn off auto arrange, you can move your desktop icons freely without worrying about alignment, empowering you to manage desktop clutter effectively.

Q2: Can I manually arrange icons even when Auto Arrange is on?

A2: No, when auto arrange is enabled, Windows will reorganize your icons automatically, based on the selected grid.

Q3: Does Auto Arrange affect folders or files within folders?

A3: No, auto arrange only affects visual icons on your desktop, not the contents of folders.

Q4: What is the difference between Auto Arrange and Align to Grid?

A4: Auto arrange keeps icons in a set order while align to grid allows them to snap to grid lines but can be moved around more freely without the constraints of auto arrangement.


That's it...

If you got more time, then you can


Control data sent to Microsoft Windows 10

Hi Welcome Again,In this Tutorial lets see how to change the Feedback data that are Sent t

to Microsoft.

[Also see : 20 things you need to do to protect your privacy in Windows 10]

What is Feedback ???

Feedback is an Important Part in Our life Whether it is For Product or others,Feedbacks 

helps us to Improve Our Skills/products. Microsoft too introduced Feedback in its Windows 

Editions for Serving as Better. All it do in Windows 10 Is through Windows 10 Feedback 

App Which We Explained in Our Previous Article [Check this link !!].

How to Control ???

Controlling Feedback App is an Important Part as it Maylead to Privacy concern. This is 

Because When We Tried A new App We Are Prompted to Provide Feedback,When We 

Provided Feedback all Our Usage on that App Are Stored and Sent to Microsoft,Which 

Microsoft Checks for User Experience... So lets See How to control this,Just Follow the 

Steps as it is in Your Windows 10 PC.

Step 1 : Login to your Windows 10 PC.

Step 2 : Open Settings.

[See : How to Open Settings]

Step 3 : Click on Privacy.

Step 4 : A new Window Will Open With General as First Option,Click on Feedback & 

diagnostics Which Will be on left pane.

Step 5 : Find and Click under Diagnostic and Usage data,Which Will be on right Pane.

Step 6 : And the Option is Enhanced by default,Click and Change it to Basic.


Control data sent to Microsoft Windows 10


Step 7 : Close the Window.

That's it.. 

Turn on or off Feedback settings in Windows 10

Hello and Welcome to Our Blog,In this Tutorial lets see how to turn on or off Feedback 

frequency in Windows 10.

What is Feedback Frequency ???

Feedback frequency is an Option in Windows 10,from Which Microsoft Asks Users 

Feedback about this Windows 10. This Feedback Frequency Will be Used by Microsoft for 

Further improving their Products and Making them to Serve as More...So in this Tutorial lets 

See how to turn on and Off this Setting in Windows 10.

How to do it???

Turning on and Off this Setting is an Easy Process,All you need to do is My friend is to just 

follow the Steps below...

Step 1 : Login to your Windows 10 PC.

Step 2 : Open Settings.

[See : How to Open Settings]

Step 3 : Click on Privacy.

Step 4 : A new Window Will Open With General as First Option,Click on Feedback & 

diagonistics Which Will be on left pane.

Turn on or off Windows Feedback settings in Windows 10


To Turn on :


  • Follow Steps 1 to 4.


  • Click under Windows Will Ask My Feedback Which Will be Under Feedback Frequeny on right Pane.


  • Select and Change Automatic to Once in A Day or other (except never).


To Turn off :


  • Follow Steps 1 to 4 .


  • Click under Windows Will Ask My Feedback Which Will be Under Feedback Frequeny on right Pane.


  • Change Automatic or Anything in it to Never.


That's it...

Switch User in Windows 10/11: A Guide for Beginners and Senior Citizens

Learn how to efficiently switch user accounts in Windows 10 and Windows 11 with our guide tailored for beginners and senior citizens. This article walks you through the process step-by-step, highlighting essential methods such as switching from the Start Menu, using keyboard shortcuts, and navigating the lock screen. Discover the importance of user accounts for privacy and personalization, along with tips for creating guest accounts and managing multiple users. We also provide troubleshooting advice for common switching issues and security tips for safeguarding your user accounts. Perfect whether you're using Windows for the first time or helping a family member, this user-friendly guide ensures that you can enjoy a seamless computing experience. Empower yourself with the skills to switch users effectively, keeping your files secure and tailored to your preferences.

What Does "Switch User" Mean?

In the context of computers, particularly Windows 10 and Windows 11, "Switch User" is a function that allows you to change from one account to another without completely logging off the first user. This is especially useful for families or shared computers, as it enables multiple users to have personalized settings and maintain their privacy.

1. Importance of User Accounts

User accounts are essential for maintaining privacy and control over individual preferences and documents. It becomes especially important in households where multiple family members use the same device. Each user can have their own background, settings, and files, contributing to a more personalized and manageable experience.

2. Understanding Windows 10 and Windows 11

Key Differences Between Windows 10 and Windows 11

Before diving into how to switch users, it’s essential to understand the environment in which you are working. Windows 11 introduces a modernized design compared to Windows 10. While the functionalities remain similar, Windows 11 has a centered Start Menu and integrated tools like Snap Layouts.

Navigating the Interface

The interface in Windows 11 may appear more modern and streamlined, which can ease the transition for new users. Understanding the interface is crucial for effective use, especially for senior citizens and beginners who might initially feel overwhelmed by technology.

3. Creating a User Account

Step-by-Step Guide to Creating a User Account

  1. Open the Settings app by clicking on the Start button and then selecting the gear icon.
  2. Navigate to Accounts.
  3. Click on Family & other users (Windows 10) or Other users (Windows 11).
  4. Select Add someone else to this PC.
  5. Follow the prompts to create an account, either using an email or choosing to set up a local user account.

Types of Accounts: Administrator and Standard Users

Every computer can have two types of user accounts:

  • Administrator: This type has full control over the computer, enabling changes to settings for other users.
  • Standard Users: These accounts can use the computer but cannot modify settings that affect other users.

4. Switching User Accounts in Windows 10

Method 1: Through the Start Menu

  1. Click on the Start Menu.
  2. Select your user icon at the bottom left.
  3. Choose Switch user from the dropdown.
  4. Select the other account you want to switch to easily.

Method 2: Using Keyboard Shortcuts

To quickly switch users, press Ctrl + Alt + Del and then click on Switch user. This method is handy for those who prefer using shortcuts.

Method 3: Using Ctrl+Alt+Delete

  1. Press Ctrl + Alt + Delete on your keyboard.
  2. Choose Switch user from the options.
  3. Select the desired account from the list.

5. Switching User Accounts in Windows 11

Method 1: Through the New Start Menu

  1. Click the Start Menu button.
  2. You will see your user icon; click on it.
  3. From the menu that appears, choose Switch user and select the desired account.

Method 2: Using Key Combinations

Press Windows + L to lock the screen. From the lock screen, you have the option to switch to another user account.

Method 3: The Lock Screen Method

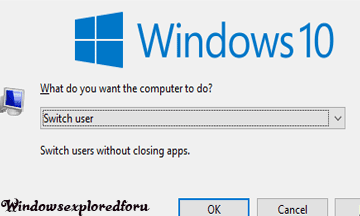
You can also switch users directly from the lock screen. If the screen is locked, simply click on the account icon and select another account. You can also do by pressing Alt + F4, and selecting switch user! Beware, it will close other applications.

Switch user in Windows 10


Using Run Command.

Step 1 : Open Run Command, by Pressing Windows + R Keys.

Step 2 : Type tsdiscon

Switch user in Windows 10


Step 3 : Select Ok.

6. Understanding User Switching and Its Benefits

Why Switch User Accounts?

Switching user accounts allows each person to have personalized settings, browsers, and documents without having to log in and out repeatedly. This maintains privacy and security for each user's files. Managing multiple user accounts on Windows becomes simpler as you can switch back and forth seamlessly, which is particularly beneficial for families.

Managing Multiple Accounts

For more than one user, the ability to efficiently switch users is invaluable. This is especially true for senior citizens who may appreciate an easy way to access their specific settings and files without navigating complex menus.

7. Troubleshooting Common Issues

Account Not Displaying

If you don’t see the account you want to switch to, ensure that the account was created correctly in the user accounts settings.

Unable to Switch User

If you encounter difficulties, restarting your computer may resolve temporary issues, allowing you to switch users successfully.

Password Problems

Forgotten passwords can be an obstacle, but you can use password recovery options during login. Follow the prompts to reset your password securely.

8. Setting Up a Guest Account

How to Create a Guest Account

  1. Go to the Settings app.
  2. Click on Accounts and then navigate to Family & other users.
  3. Select Add someone else to this PC.
  4. Create a new account using the local user option and label it as a guest account. Limit the permissions as needed.

Limitations of a Guest Account

Guest accounts can be handy for temporary access, but they are restricted from installing software or making changes to system settings. This protects your computer while still providing access to guests.

9. Security Tips for User Accounts

Importance of Strong Passwords

Always use strong, unique passwords in your user accounts to enhance security. Avoid common phrases, and consider using a mix of letters, numbers, and special characters for better protection.

Enabling Two-Factor Authentication

When available, set up two-factor authentication for added security. This ensures that even if someone gets your password, another verification step is needed to access the account.

In short, switching users in Windows 10 and Windows 11 is a straightforward process that significantly enhances user experience, privacy, and security if you don't want to leave the current work.

11. FAQs

What if I Forget My Password?

If you forget your password, you can use the password reset option during login. Follow the prompts to recover your password securely.

Can I Switch Users Remotely?

No, switching users generally requires physical access to the computer. However, certain remote desktop applications may allow user switching with additional configurations.

Do I Need to Log Off to Switch Users?

No, you do not need to log off to switch users on Windows 10 or Windows 11, allowing for a seamless experience and continuity of work.


That's it...

If u got more time, then..